STSPOS
STS POS HELP CENTER WINDOWS

Your register.
From start to finish.

The complete Windows user guide. Set up your store, serve your first customer, and finish the day with confidence.

Version 1.1.12 · Build 17Updated September 11, 2026
Browse all 47 chapters

47 chapters · 269 step-by-step instructions

Start at the beginning or jump to a task. Button names appear in bold. Access labels show who can use each feature. Screenshots use example data; your items, staff and permissions will differ.

Download the complete PDF with linked contents for offline training, or choose Print guide to use your browser’s print layout.

STS POS · Windows user guide

Version 1.1.12 · Build 17 · September 11, 2026

Full guide: https://stspos.com/guide/windows · Support: support@stspos.com

01Getting started

Before you start

Prepare your account, Windows computer and checkout hardware before installing STS POS.

ACCESSOwner

What you need

  • A Windows 64-bit computer approved for your hardware setup, with internet access for downloading, activation and license checks.
  • A touchscreen or mouse and keyboard. The POS is designed around a 1280 × 1024 register screen; check Windows display scaling so all controls fit.
  • Your STS website account, verified email, store details and an approved register allowance. Each activated computer uses one device allowance.
  • A compatible barcode scanner, a receipt printer installed in Windows, and a compatible cash drawer if you use one. Confirm models and connections with STS support.
  • An extended second monitor for the customer display, if required. Payment hardware and services are arranged separately with your payment provider.

Understand the two accounts

A website password is not automatically your POS Owner password. Adding a POS employee does not give that person access to your website account.

AccountUsed for
Website accountSign in at stspos.com to manage your store, subscription, downloads, registers and POS staff.
POS Owner accountSign in inside the installed Windows app using the local Owner username/password or optional Owner PIN.
Manager / Cashier PINA unique four-digit PIN recognizes that employee and their permitted actions inside the POS.

For an existing register

Keep using the existing store and Owner account. Updating or reinstalling preserves its data. Do not create a replacement store or delete the local database to solve a sign-in problem. If you are moving to another computer, follow the register-replacement chapter first.
02Getting started

Download and install the app

Get the official Windows installer from your customer dashboard and create the STS desktop shortcut.

ACCESSWebsite account holder

Create your website account

  1. Open stspos.com on the POS computer and choose Get started. Enter your business and account details.
  2. Verify your email using the verification message, then sign in to the website dashboard.
  3. Complete your store details and choose the subscription for the number of registers you need. Checkout and payment verification are followed by STS administrator approval.
  4. Wait until the dashboard shows approved access. A checkout confirmation alone does not activate a register or unlock a pending download.

Install STS POS for Windows

  1. Open Dashboard → Registers. Find Install STS POS for Windows and check the version shown.
  2. Select Download Windows installer. Save the file on this computer; do not use an installer from an unknown sender.
  3. If STS POS is already installed, finish or hold the current receipt, resolve any unfinished payment, and exit the app as Owner before installing.
  4. Open the downloaded STS-POS-Setup file and follow the installer. It installs for the current Windows user and creates an STS POS desktop shortcut.
  5. When installation completes, open STS POS using the new desktop shortcut. Keep using the same Windows user account for that register.

After installation

A new computer opens activation/setup. An existing register keeps its accounts, stock, sales and activation. The installer saves a pre-update backup and retains older app folders; use the updated shortcut instead of opening an old executable.

If you receive a ZIP package from support, extract it first and keep the executable, DLLs and data folder together. Never run only the EXE copied out of that folder. Downloading again does not use an additional device allowance.

03Getting started

Activate and connect a new register

Link the correct Windows computer to the correct store with a private activation code.

ACCESSWebsite account holder / Owner

Create an activation code

  1. In Dashboard → Registers, check that your store has an available approved device allowance.
  2. Enter a useful register name, such as Front counter, then choose Create activation code.
  3. Keep the code private and use it on the intended POS computer. The code expires in 10 minutes; creating another code replaces the previous unused code.
  4. Enter the code in the Windows app and choose Connect this register while online. Check that the displayed store and register are correct.

Connect store data

Follow the store connection prompts. A brand-new store with no staff presents Create Owner account. An additional register connected to an existing store retrieves its shared staff and catalog; do not create duplicate staff because the first sync has not finished.

For an existing database that has not been connected, the Owner uses Settings → Cloud & backups. Read the connection confirmation carefully. The app backs up before connecting existing local data. Contact support if the local records belong to a different store.

04Getting started

Owner setup, PINs and signing in

Create the first POS Owner, use employee PINs, and leave the register securely.

ACCESSAll staff

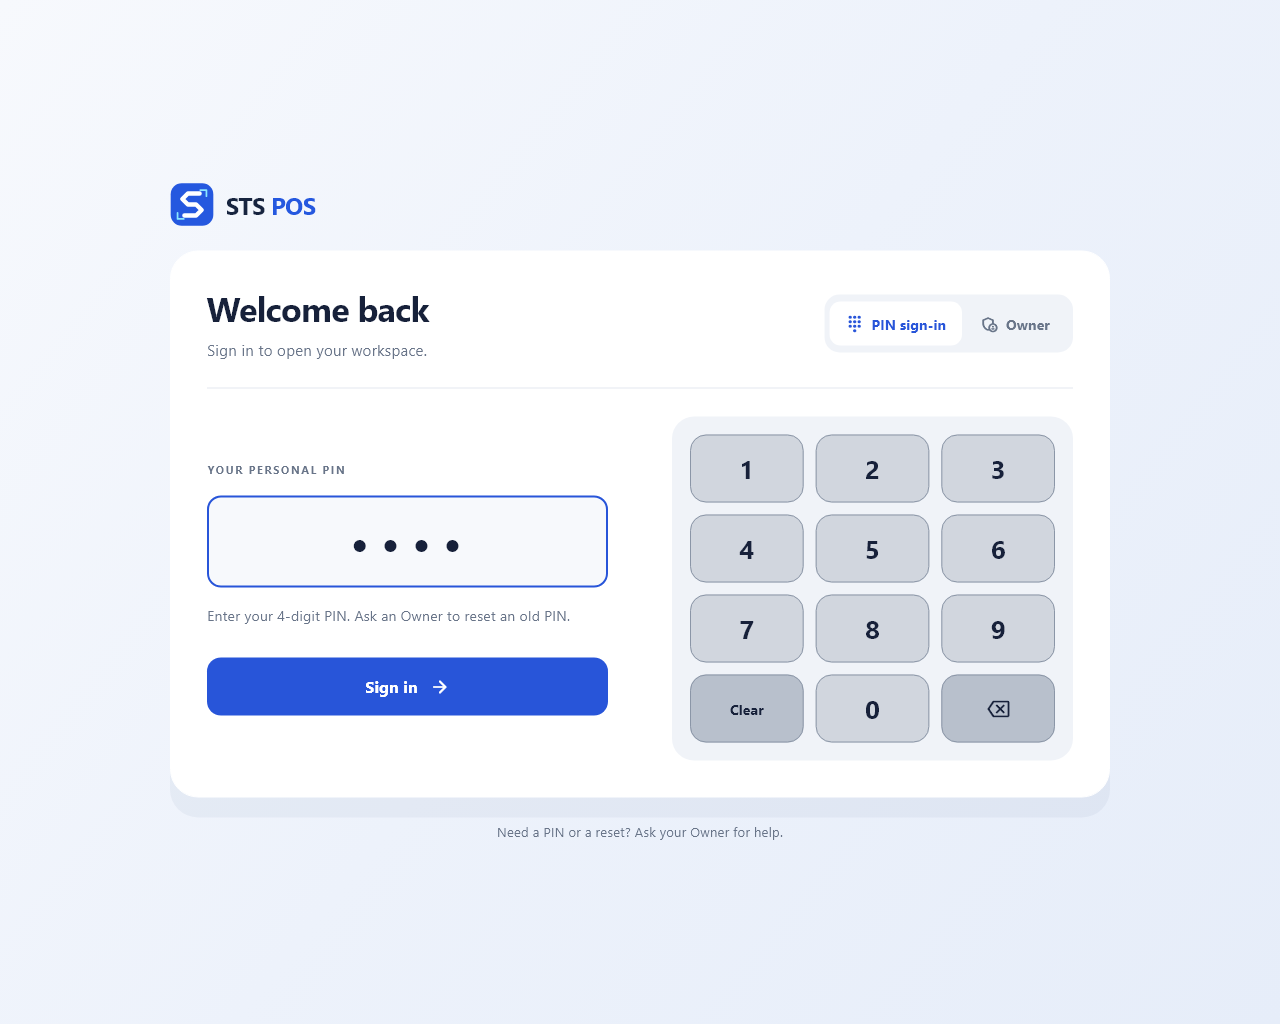
STS POS employee PIN sign-in screen
The POS sign-in screen. Example screen; no customer account is shown. View full size

Create the first Owner

  1. On Create Owner account, enter the requested name and Owner username.
  2. Create and confirm a password of 12–128 characters, then save. Store these credentials securely.
  3. After signing in, open Settings → Staff & roles → Staff accounts, edit the Owner and optionally set a unique four-digit Owner PIN.

Daily sign-in

  1. Cashiers and Managers enter their unique four-digit PIN. The system recognizes the person and role automatically.
  2. An Owner can use the configured Owner PIN or select Owner and enter the POS username/password.
  3. Check the displayed employee name before starting work. Use your own account so receipts and cash movements identify the correct employee.

Switch account, lock and exit

Use the account button at the top right to access the account actions. Finish or hold an unpaid receipt before switching away when prompted. Never leave a payment with an uncertain terminal result for the next cashier to guess.

The Windows register runs in kiosk mode. The Owner exits from Account → Exit application; the usual window-close controls and Alt+F4 are restricted. Automatic idle locking is configured in Register health and only locks an idle register with an empty receipt.

05Getting started

Find your way around the POS

Learn the cashier screen, Settings navigation and how changes are saved.

ACCESSAll staff

STS POS Settings navigation with Store and register selected
Settings groups store setup, selling, management and register tools in one place. View full size

Cashier screen

AreaWhat it does
Current receiptShows the basket, quantities, discounts, tax and amount due.
Register / item buttonsAdds visible products with a tap. The Owner can arrange and style these buttons.
Search / Price checkFinds an item or checks its price without guessing the barcode.
Sales history / End dayOpens saved sales or day-closing tools when your role permits them.
Payment buttonsStarts Cash, Card or EBT checkout for the current receipt. Available methods are set by the Owner.
Account buttonShows account actions, Settings, software updates and the Owner exit action.
FooterShows the version, local storage and actual cloud-connection status.

Settings navigation

Open Settings from the account controls. On the left, choose Store & register, Inventory, Item layout, Checkout & tax, Payment methods, Receipt design, Reports, Staff & roles, Hardware, Customer display, Cameras, or Cloud & backups. Your role determines which entries appear.

Store & register → Quick setup provides shortcuts to the setup areas, including the customer display. A missing button can mean your role lacks permission; ask the Owner instead of sharing another employee’s PIN.

Saving and keyboard entry

Use Save changes (or Save on a narrow screen) for changes in the main settings form, including payment visibility and camera details. Dialogs have their own Save/Confirm buttons. Customer-display selection, its startup switch and advertisement changes save immediately as indicated on that screen.

Tap a field to enter text or numbers with the available keyboard/keypad. Close the keyboard to reveal lower controls if necessary. Finish or cancel an open form before returning to scanning; a scanner can type into a focused input field. On the cashier screen, F2 focuses the scanner field.

06Getting started

Complete your first setup

Use this sequence to prepare the store before the first real sale.

ACCESSOwner

Setup checklist

  1. In Settings → Store & register, enter the store name and register name, then save.
  2. Configure Checkout & tax and Payment methods. Review the store’s required tax treatment and the methods actually accepted at its separate terminal.
  3. Add categories and items in Inventory, or import your reviewed spreadsheet. Set selling prices, stock tracking, tax flags and SNAP eligibility for each item.
  4. Choose which items appear on the cashier screen and arrange them under Item layout.
  5. Add employees in Staff & roles and review Manager/Cashier permissions.
  6. Set up Hardware → Receipt printer & tests, the cash drawer, receipt design and the customer display.
  7. Configure Cloud & backups, verify the correct store connection, and make a backup.
  8. Use Payment methods → Open payment simulator to train staff without creating live sales. Then test the physical hardware separately.
  9. Exit the simulator, sign in with the intended account and start the real register day with the actual opening cash.

Check before serving the first customer

  • Scan a known product and confirm its name and price.
  • Confirm receipt tax, payment buttons and any age-verification prompts.
  • Check the selected receipt printer, drawer and customer monitor.
  • Confirm the correct staff name, store/register name and open register day.
  • Review backup status and resolve any connection or activation message.
07Selling at the counter

Start the register day

Record the opening cash before cashiers begin selling.

ACCESSStart/end day permission

Open the day

  1. Sign in as Owner or an employee permitted to start/end days.
  2. On Start your register day, choose Start day.
  3. Count the cash physically in the drawer and enter the opening amount. Use the bills-and-coins counter if needed.
  4. Save the opening amount. The cashier screen becomes available once the day is open.

If a cashier sees “The register day is closed”

An authorized employee must start the day. Use Switch accounts, or choose Check again after the authorized person opens it. Opening a day is a register operation, not an individual time-clock shift.

Do not enter sales revenue as opening cash. Later cash added to or removed from the drawer belongs in Paid in / Paid out, so expected cash can be reconciled accurately.

08Selling at the counter

Scan items and manage the basket

Build an accurate receipt using a scanner, item buttons or search.

ACCESSMake sales

Add and check items

  1. From the cashier screen, scan the product barcode or tap its item button.
  2. Check the name, price and quantity in the current receipt. Repeated scans add more units; the combine-items setting controls how repeated items are displayed.
  3. Use Search to find items by the available name/barcode search when a button or barcode is not available.
  4. Use Price check to look up the price, then return to checkout. A price check does not itself complete a sale.
  5. Select an item’s quantity/removal controls to correct the unpaid basket. Review the total before taking payment.

Warnings and corrections

  • An unknown barcode is not automatically a new inventory item. Dismiss the warning, verify the barcode, and ask an authorized employee to add or correct the item.
  • If stock tracking blocks a sale, check stock and receiving rather than repeatedly scanning.
  • Do not alter the basket while a confirmed or uncertain payment is pending. Resolve that payment first.
  • If an item must be edited in Inventory, remove it from the unpaid basket first when the app requests it, then add the corrected item again.

Before taking payment

Confirm quantities, discounts, eligibility and any required age check. The system rechecks current prices, stock and permissions when completing checkout. If an item changed while the basket was open, review the message and correct the basket instead of forcing an old price.

09Selling at the counter

Open-price items and age checks

Handle items whose price is entered at checkout and products that require an age check.

ACCESSMake sales / configured items

Open-price sale

An open-price item is an intentional catalog setting. It does not give cashiers unrestricted permission to edit every product price.

  1. The Owner enables the open-price option on the item in Inventory → Add/Edit item.
  2. When a cashier adds that item, enter its selling price in the price prompt and confirm.
  3. Check the resulting line price before adding more items or taking payment. Cancel the prompt if the item should not be sold.

Age verification

  1. The Owner sets the item’s Age verification to unrestricted, 18+ or 21+ as appropriate for the store’s requirements.
  2. When the POS asks for verification, check the customer’s identification using your store’s approved process.
  3. Confirm only after completing the check. If verification cannot be completed, cancel the sale of the restricted item and follow store policy.
10Selling at the counter

Apply discounts and promotions

Review automatic offers and apply an allowed manual discount before payment.

ACCESSManual discount permission

Manual discount

  1. Build the unpaid receipt and open its Discount action.
  2. Choose the item or receipt scope and the discount type offered in the dialog.
  3. Enter the amount or percentage and an optional reason. Choose Apply discount and review the resulting total.
  4. Check the discounted lines and final total. Remove or correct the discount before payment if it is wrong.

Automatic offers

Enabled, active item promotions and mix-and-match offers are evaluated from the saved catalog and basket quantities. Check the shown offer and final price; adding a manual discount should not be used to guess a second promotion.

Tax and EBT calculations use the discounted item amounts. Once a sale is saved, correct it through the permitted return/refund workflow rather than editing its original receipt.

11Selling at the counter

Hold, resume and clear receipts

Pause an unpaid order or clear it with the required approval.

ACCESSMake sales / clearing permissions

Hold and resume

A held order is unpaid. It is not a completed receipt or proof of payment. Prices, eligibility and stock are checked again when the order is completed.

  1. Before payment, choose Hold on the current receipt.
  2. Enter a useful label or note and confirm. The basket is saved as a held order so the register can serve another customer.
  3. Open the held-order list and search for the label/customer reference.
  4. Choose the correct order, review its items and resume it. Resolve your current basket first if prompted.
  5. Finish payment normally. A completed held order is no longer available to be sold again.

Clear an unpaid receipt

  1. Choose Clear and read the confirmation.
  2. If your role cannot clear a transaction directly, ask a permitted Manager or Owner to enter their own approval PIN.
  3. Enter the reason if requested and confirm. A denied/cancelled approval leaves the basket intact.
12Payments and receipts

Take a cash payment

Enter the cash received, return the shown change and confirm the saved sale.

ACCESSMake sales

Complete cash checkout

  1. Review the basket total and choose Cash.
  2. Enter the money physically received from the customer. Use the keypad or offered tender shortcuts.
  3. Check the amount due and change. If the cash is insufficient, correct the tender before completing.
  4. Confirm the payment. Wait for the saved-sale confirmation before beginning another transaction.
  5. Return the displayed change. Choose Done, or allow the confirmation to close after its countdown.
  6. If automatic receipt printing is enabled, the selected printer receives the receipt. Use the receipt reprint action if a deliberate extra copy is needed.

Drawer and printing problems

The configured drawer is requested after the sale saves. A printer or drawer fault does not mean the sale was lost. Check the saved receipt before retrying a sale or collecting payment again.

Cash included in drawer expectations is the amount applied to the sale after change, not the entire banknote amount the customer handed over.

13Payments and receipts

Credit, Debit and split payments

Take payment on your separate terminal, then record its actual result in STS POS.

ACCESSMake sales

Record an approved terminal payment

  1. Review the basket and choose Card, then Credit or Debit as appropriate.
  2. Check the requested amount in Separate terminal payment.
  3. Process that amount on the merchant’s separate payment terminal.
  4. Only after checking the terminal result, record the actual approved amount in STS POS. Enter the optional last four digits/reference when available; never enter a full card number or customer PIN.
  5. If money remains due, choose another enabled payment method and repeat for that remaining balance.
  6. Finish the sale only when the entire amount due is covered. Check the receipt’s payment breakdown.

Partial approvals and cash balance

For a partial approval, record only the amount actually approved. The POS keeps the remaining balance due. Cash entered for a split payment is applied according to the amount shown in that payment dialog; review any cash/change confirmation.

Use EBT first for eligible goods when combining it with other methods, then collect the remaining cash/card balance.

Declined, cancelled or uncertain

  • Declined or cancelled: no approved amount should be recorded. Confirm the terminal result before choosing another method.
  • Connection lost or unknown: check terminal history or contact the provider. Do not treat a timeout as a decline and charge again.
  • A saved confirmation in STS POS records the terminal result; it does not send a card charge or refund.
14Payments and receipts

EBT eligibility and split checkout

Show the eligible amount, record an actual EBT approval, and collect the remaining balance.

ACCESSMake sales / Owner setup

Owner preparation

  1. Review each applicable item’s SNAP eligible flag in Inventory. Item names and categories do not classify eligibility automatically.
  2. Check each item’s Apply sales tax setting and the register’s configured tax rate.
  3. Enable EBT under Settings → Payment methods and save. Use your payment provider’s approved EBT setup and review the store’s eligibility requirements with the appropriate provider/adviser.

Cashier checkout

  1. Add the items and review the EBT eligible amount. That amount is an eligible subtotal, not proof of benefits balance or an approved payment.
  2. Choose EBT. Check the eligible limit and requested amount.
  3. Process the EBT amount on the separate terminal and confirm only the amount actually approved.
  4. Review the recalculated tax and remaining amount due. Collect the remainder with another enabled method.
  5. Finish the sale and check the EBT tender shown on the completed receipt.

What appears on the screens and receipt

When EBT is enabled, checkout and the customer display show the eligible amount. When it is disabled and settings are saved, that live amount disappears and new EBT payments are blocked.

Completed receipts show EBT when the saved sale contains a positive EBT payment. A cash/card-only receipt omits EBT. Reprinting an older EBT receipt keeps its actual historical payment details even if EBT has since been disabled.

The POS adjusts the configured tax calculation for the eligible portion paid with EBT. Review your catalog and tax setup before live use; the app does not automatically determine your business’s eligibility or tax obligations.

15Payments and receipts

Recover interrupted payments

Resume the original saved payment when a checkout is interrupted.

ACCESSOriginal cashier / Owner

After an interruption or restart

  1. Read the recovery message and identify the original receipt/payment before starting another sale.
  2. Sign in as the original cashier or Owner when required, then resume the existing pending operation.
  3. Check the separate terminal’s transaction history for each uncertain payment.
  4. Confirm the verified result in the POS. Already confirmed payments remain credited; collect only the displayed unpaid balance.
  5. Finish the original sale once fully paid, then reconcile its receipt with the terminal record.

Remove or reverse a payment

Removing a confirmed payment requires the relevant refund permission and confirmation that the physical cash was returned or the separate-terminal void/refund was completed. STS POS does not automatically reverse the terminal transaction.

A partially paid receipt cannot be cleared or the register day closed while it remains unresolved. If you cannot establish the result, keep the original record and contact your payment provider and STS support.

Unpaid basket recovery

An ordinary unfinished, unpaid basket may be offered as Recover unfinished receipt after restart. Review it and choose the recovery action. This restores the basket; it does not prove any payment was received.

16Payments and receipts

Find, scan and print receipts

Open the saved sale immediately from its barcode and print to your configured receipt printer.

ACCESSReceipt lookup / reprint permissions

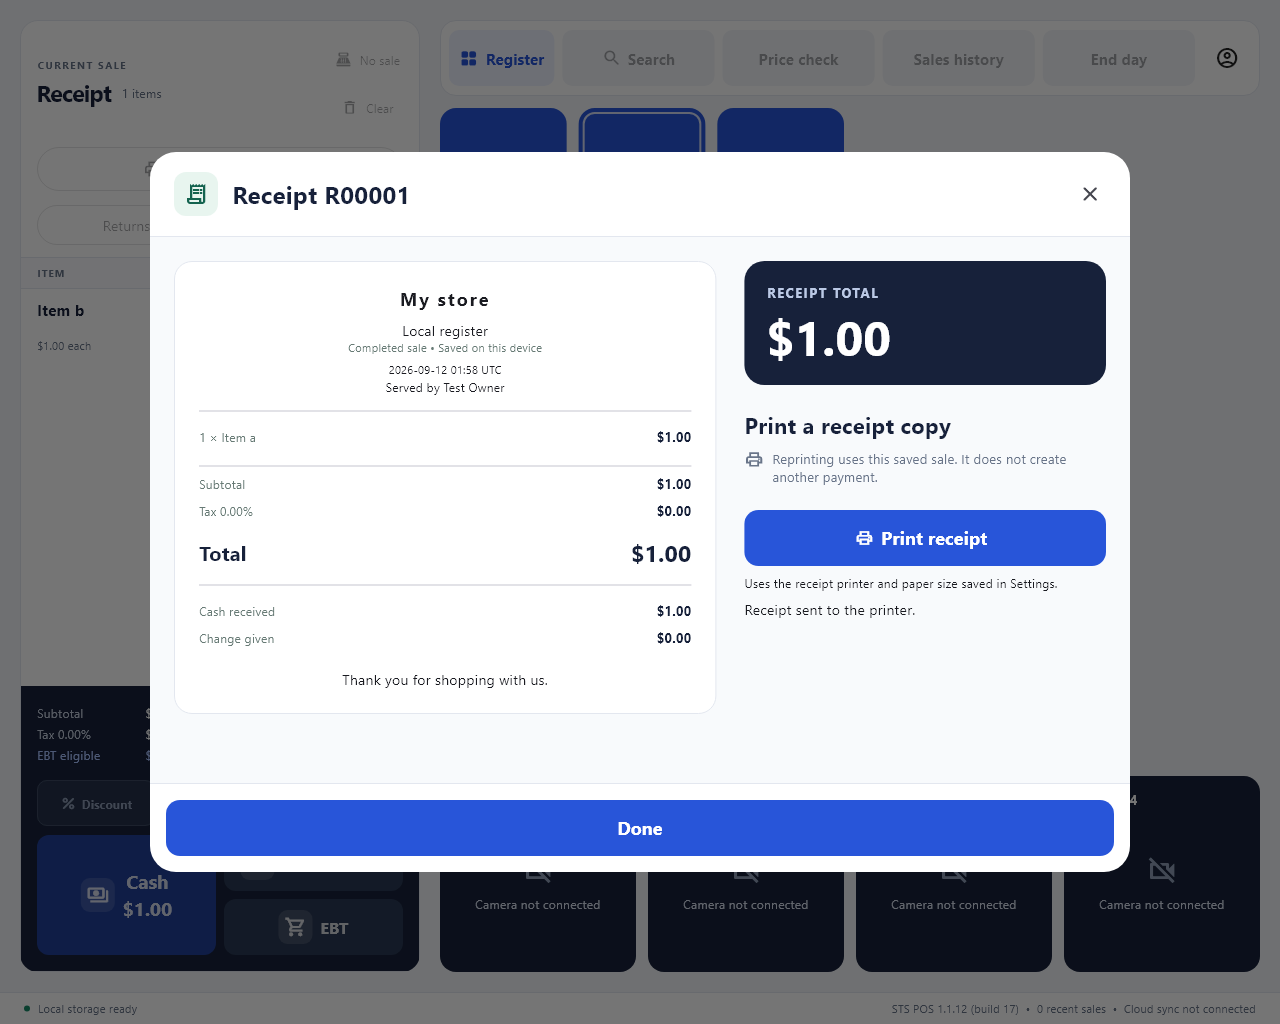
Saved receipt with Print receipt and confirmation that it was sent to the configured printer
Print receipt uses the printer and paper size already saved in Settings. View full size

Scan a receipt barcode

Receipt barcode lookup uses the sales saved on the register that issued the receipt. Do not assume a receipt from another register will open locally.

  1. At the cashier screen, scan the barcode printed on an STS receipt.
  2. The matching saved receipt opens immediately if your account permits receipt-barcode lookup.
  3. Check the receipt number, date, items and total. The current basket stays unchanged.
  4. Choose Print receipt for a copy, or Done to return to the current basket.

Print receipt or reprint the last sale

  • Print receipt in a saved receipt uses the printer and paper size from Settings → Hardware → Receipt printer & tests. It does not show a printer picker.
  • Reprint last receipt sends one copy directly to the configured printer without opening a receipt preview or printer picker.
  • These copy actions do not open the cash drawer and do not create another sale.
  • If the saved printer is missing, the app reports the problem instead of choosing a different Windows printer. Check the printer before deliberately retrying.
  • A confirmed dispatch does not prove paper physically came out. Check the printer queue, connection, cover and paper if needed.

Search saved sales

Open Sales history and use the available receipt-number, amount, card-last-four and date filters. Results are paged; move through pages if necessary. Open the matching receipt before printing or investigating a transaction.

Access to other employees’ sales depends on the history/receipt permissions. A saved receipt retains the sale’s original item, tax, discount and payment details. Editing today’s catalog does not rewrite it.

17Payments and receipts

Return items and issue refunds

Refund against the original sale and payment methods, with clear terminal confirmation.

ACCESSReturn/refund permission

Start a return

  1. Choose Returns and find the original receipt using its number, amount, last four digits or date filters.
  2. Open the correct sale. Select the items and quantities being returned, then enter the reason.
  3. Review the refund total and allocation to the original payment methods. The system limits quantities/amounts to the original sale and earlier returns.
  4. For Credit, Debit or EBT, follow the refund instructions and complete the actual refund on the original terminal/account before confirming its result in STS POS.
  5. Complete the return record. Return any cash portion after the refund record has saved.
  6. Review the recorded return and stock change. Do not create another return just because printing failed.

Partial returns and EBT

Partial returns allocate the original tax and tender amounts. Noneligible items do not receive an EBT refund allocation. Use the refund allocation shown instead of replacing an EBT/card refund with cash.

Follow the original payment provider’s refund process. Recording a refund in STS POS does not send money back through a terminal.

Pending or uncertain refund

Reopen the existing pending refund through Returns. The selected receipt, quantities and reason are retained. Check terminal history and resolve the original operation; do not start a duplicate refund. Unresolved refunds block day closing.

Once the return is committed, stock and financial records update together. Review inventory history if a returned item needs a further authorized stock adjustment.

18Closing and reporting

No sale, Paid in and Paid out

Keep cash movements separate from sales and record why the drawer was opened.

ACCESSDrawer / cash-movement permissions

Open the drawer without a sale

No sale does not create revenue or change the expected cash amount. It is a drawer-opening record. If money is added or removed, record a separate Paid in / Paid out entry.

  1. Choose No sale at the register.
  2. Enter the opening reason and follow any account/approval prompt.
  3. Confirm once and check the physical drawer. The request is logged even if the hardware does not open.

Record cash added or removed

  1. Open Paid in when adding cash, or Paid out when removing it.
  2. Enter the amount and a clear business reason/reference.
  3. Review and save the entry, then handle the cash accordingly.
  4. Check the movement in the cash/day report. Paid in increases expected drawer cash; Paid out decreases it.

Keep the records accurate

Do not use Paid out in place of a customer refund; use Returns against the original receipt. Do not use Paid in to record a product sale. Use employee accounts and meaningful reasons so the closing employee can reconcile the drawer.

19Closing and reporting

Count the drawer and end the day

Resolve open work, count physical cash and save the day’s closing report.

ACCESSStart/end day permission

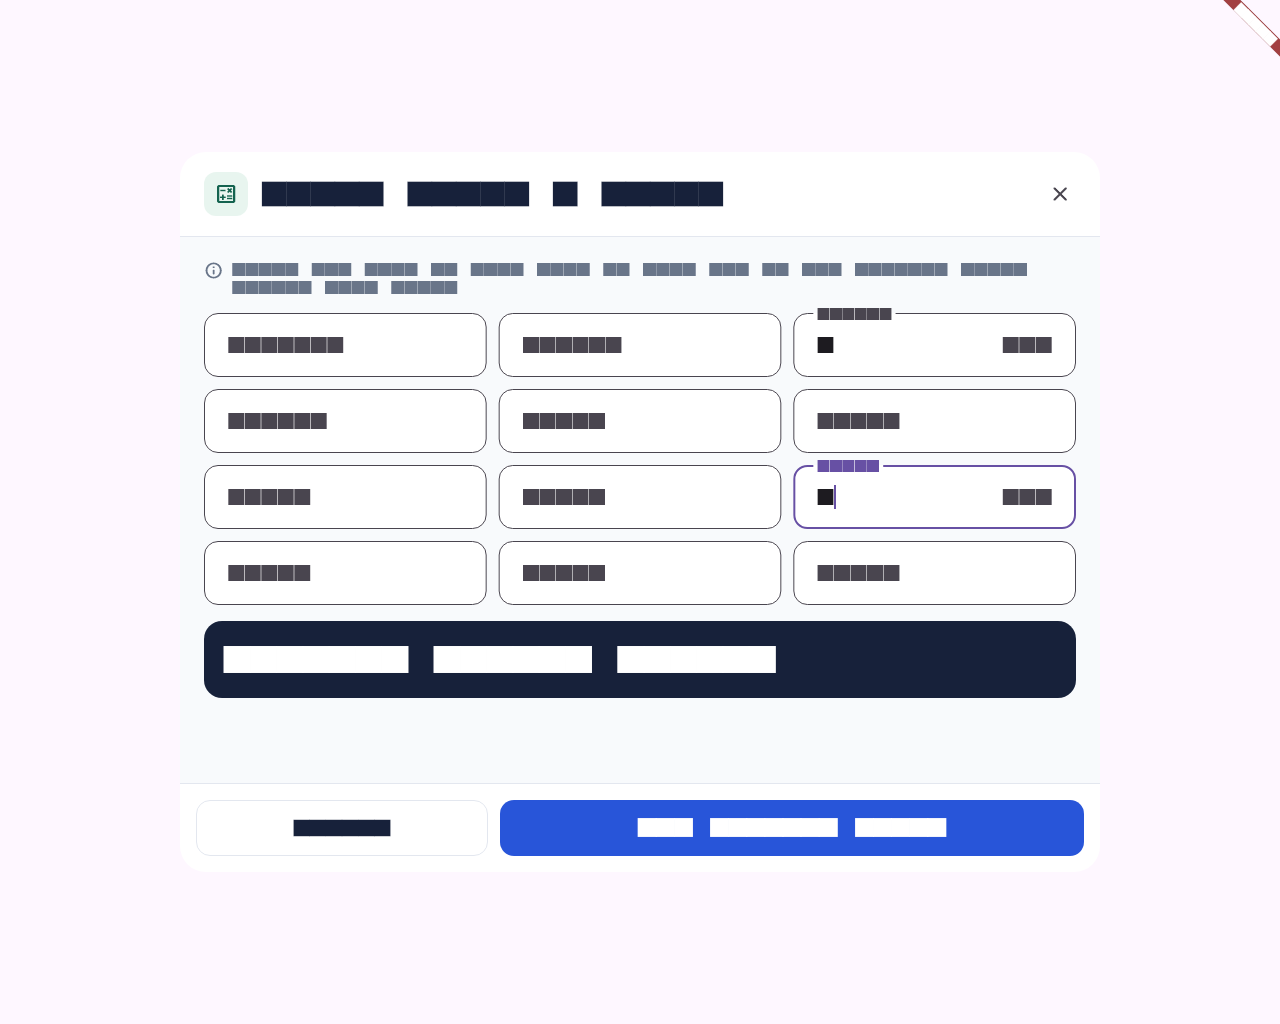
Bills and coins counter used to count the physical drawer
Count physical cash rather than copying the expected amount. View full size

Before closing

  • Finish or resolve the current receipt. Review any held orders and follow the app’s prompts.
  • Resolve every pending terminal payment and refund. Check the terminal’s settlement/history when a result is uncertain.
  • Record outstanding Paid in / Paid out entries and check that refunds use their original methods.

Close the register day

  1. Choose End day.
  2. Count the cash actually in the drawer. Use Count bills & coins to enter denomination quantities, or enter the total closing cash.
  3. Review expected cash, counted cash and the difference. Recount and check cash movements/refunds if the amounts differ.
  4. Enter the requested closing details and confirm the day close.
  5. Open the saved day report and choose Print report if needed. Check the printer/paper selection offered for reports.
  6. Confirm the day is closed and review backup/cloud status before the Owner exits the app.

Understand the difference

Expected cash is based on opening cash, cash applied to completed sales, Paid in, Paid out and cash refunds. Credit, Debit and EBT amounts are reported separately and do not belong in physical drawer cash.

Report printing is a separate action from saved-receipt reprinting and can use a print dialog. A printing failure does not undo a saved day close. Reopen the day report instead of closing the same day again.

20Closing and reporting

Sales, profit, cash and alerts

Review register activity and compare POS totals with physical cash and terminal records.

ACCESSReport-specific permissions

Where reports live

OpenUse it for
Sales historyLocate completed receipts, review totals/payment details and print allowed copies.
Settings → Reports → Day & reportsReview register days, opening/closing cash and saved day reports.
Profit, cash reconciliation & alertsReview the permitted business-report areas for the chosen period.
Website dashboard reportsReview uploaded store activity. Results depend on register cloud synchronization.

Review a period

  1. Choose the relevant report area and date/period controls, then refresh.
  2. Check the store/register, dates and employee filters shown before comparing totals.
  3. Compare cash totals with the counted drawer and non-cash totals with the actual terminal settlement report.
  4. Use the offered Print / save action when you need a report copy. Verify the print/PDF destination.

Profit and manager alerts

Profit views use recorded purchase costs; missing or incorrect costs affect the report. They are a management view of POS records, not a replacement for your accounting records.

With alert permission, review manager alerts, add notes and mark them reviewed. Alert-limit controls set daily thresholds per employee. Reviewing an alert records your review; it does not erase the underlying transaction or drawer event.

21Inventory and purchasing

Create categories and add/edit items

Build the catalog with clear names, prices, barcodes, stock and selling rules.

ACCESSInventory; tax permission for tax changes

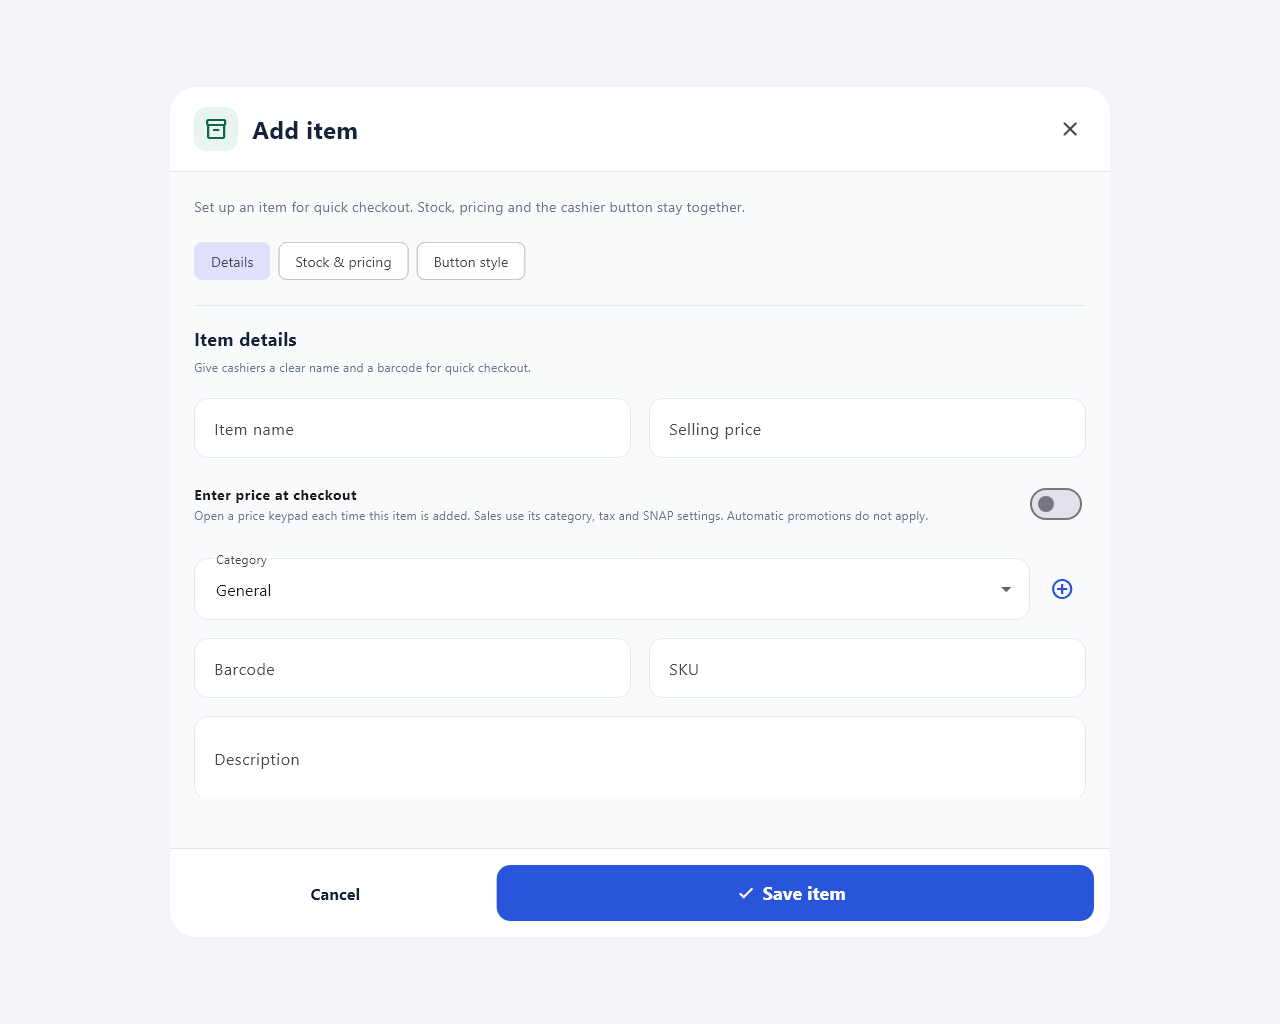
Add item form with item details and stock/pricing controls
Use the item editor for product details, stock, eligibility and button style. View full size

Create a category and item

  1. Open Settings → Inventory → Add category. Enter a category name and choose Create category.
  2. Choose Add item, or use Edit item to find an existing product.
  3. Complete Item details, Stock & pricing and Button style as needed. The exact fields below explain each choice.
  4. Save the item and verify it in Inventory. Test its barcode and button before serving customers.

Item details

FieldHow to use it
Item nameA clear cashier/receipt name, up to 80 characters.
Selling priceThe price charged for the item. Enter a valid amount.
Enter price at checkoutPrompts for the price each time the item is added. Automatic promotions do not apply to open-price items.
CategoryGroups related items. The + control can create a category without leaving the item editor.
BarcodeScan or type the product code exactly, including leading zeros. Keep codes unique.
SKUOptional internal product code, separate from the scanned barcode.
DescriptionOptional item notes.
Show on cashierControls whether an item button appears. A hidden button can still be sold by barcode.
Available for saleTurn off to make the item inactive. Its existing inventory and historical records remain.

Stock & pricing

Scale/weight-label options are disabled in the standard release. Ask STS about a supported integration before selling weighed items through a scale.

Use Stock history where offered to review why quantities changed. Do not overwrite quantities to hide a missing delivery or an incorrect return.

FieldHow to use it
Purchase costRecords cost for stock/profit calculations. Review it when costs change.
Track stockEnables quantity tracking and stock validation for the item.
Stock on handThe starting/current quantity allowed by the editor. Changing existing stock records an adjustment in inventory history. Use Receiving to record actual deliveries.
Low stock alertThe reorder threshold used for low-stock review. It does not automatically order goods.
Age verificationNo restriction, 18+ or 21+; the cashier checks ID before payment.
SNAP eligibleOwner-reviewed eligibility for EBT checkout; not inferred from the item name.
Apply sales taxWhether the configured register tax applies to this product. Changing tax treatment requires the relevant permission.

Edit or retire an item

Find the existing item, review its identifiers and save only the intended changes. Remove it from the current basket before editing when prompted. Turn off Available for sale to stop future sales without deleting past receipts.

Changes to catalog items do not rewrite already completed receipts. Update all affected registers through normal cloud synchronization and check conflicts if a change does not appear.

22Inventory and purchasing

Item pictures and cashier layout

Make recognizable item buttons and arrange the cashier screen for quick use.

ACCESSInventory / Arrange item buttons

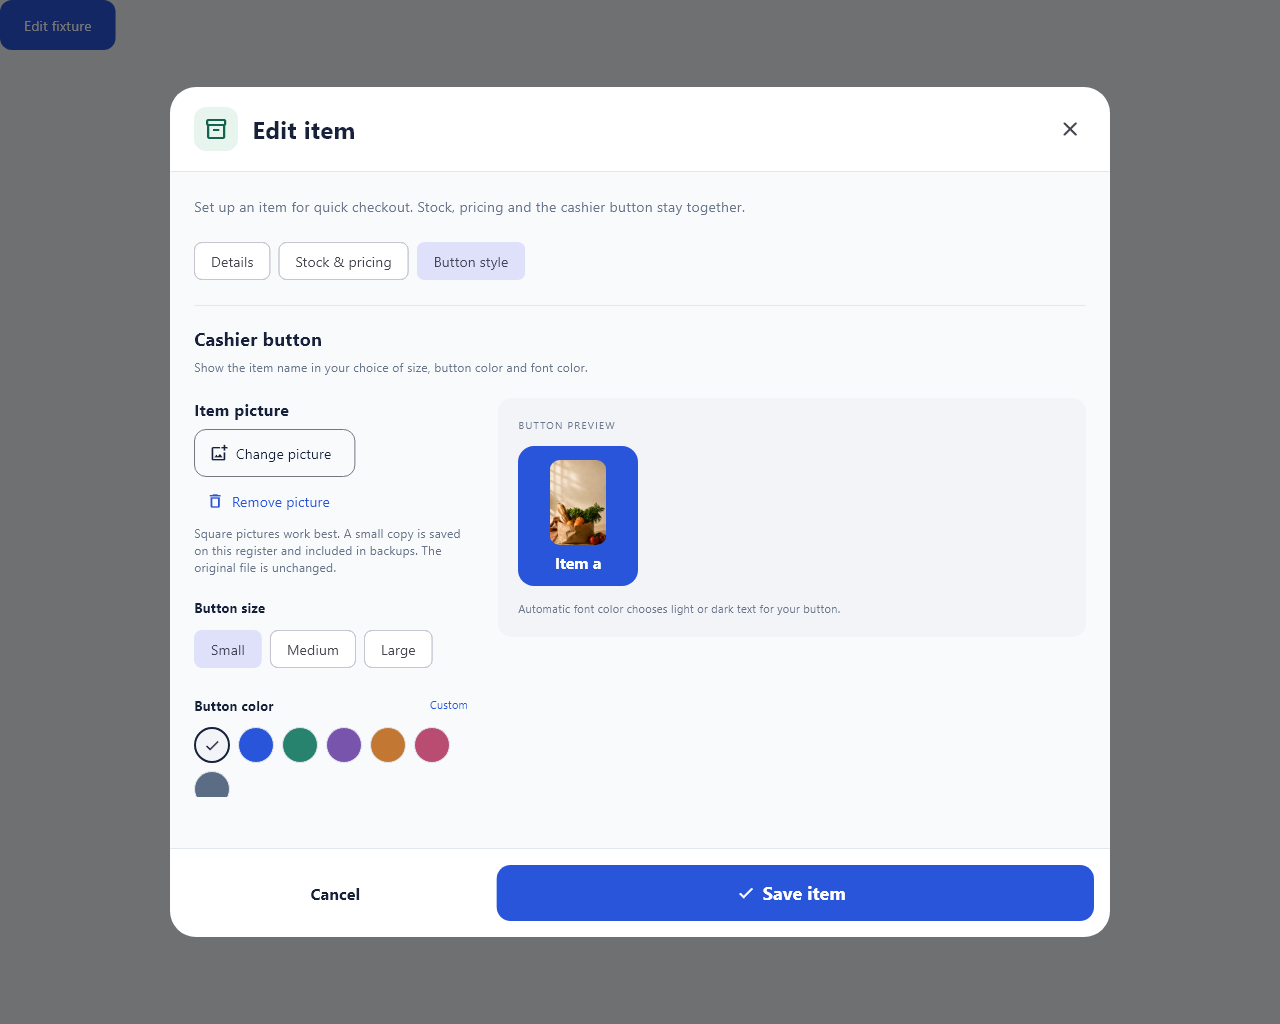
Item button style editor with a picture and live preview
Preview the button before saving its picture, colors and size. View full size

Add or change an item picture

The POS saves a compact thumbnail and leaves the original file unchanged. The picture survives restarts and is included in the register database backup. Item pictures are local to this register; they do not sync to other registers.

  1. Open Inventory → Add/Edit item → Button style.
  2. Choose Add picture and select a PNG or JPG image, up to 20 MB.
  3. Review the button preview. Use the change/remove controls if the picture is wrong.
  4. Save the item and check the button on the cashier screen.

Colors, size and visibility

Use the button background, text-color and size controls in Button style. Custom color entry accepts a six-digit hexadecimal color; check the live preview for readable text.

Keep Show on cashier enabled for items that need buttons. Hiding a button is different from making an item unavailable for sale. An active hidden item can still be scanned.

Arrange the screen

  1. Choose the items that should have buttons using Show on cashier in Inventory.
  2. Open Settings → Item layout → Arrange items.
  3. Tap an item, or choose it from Item to place, then tap an empty space to place it. Other items stay in place. Put frequently used items within easy reach.
  4. Choose Save layout to keep the arrangement, or Cancel to leave without applying it.
  5. Return to Register and check the result at the register’s normal display size. If a button needs more space, return to Arrange items or choose fewer buttons.
23Inventory and purchasing

Import items from Excel or CSV

Prepare, preview and confirm a catalog import without losing barcode leading zeros.

ACCESSInventory + Import inventory

Prepare the file

  1. Open Settings → Inventory → Inventory tools → Excel / CSV import and choose Save CSV template.
  2. Fill the template with your own reviewed products. Use an .xlsx workbook or UTF-8 .csv file, up to 10 MB and 1,000 items per import.
  3. In Excel, format barcode and SKU cells as Text before entering them. Preserve all leading zeros.
  4. For .xlsx, put the import on the first worksheet and replace formulas with values. Correct cell errors and remove unsupported columns.
  5. Check prices, costs, quantities, tax flags and SNAP eligibility before loading the file.

Template columns

ColumnMeaning
name / barcode / categoryThe product name, exact scanned code and category.
price / costSelling price and purchase cost as currency amounts.
stock / reorder_levelOn-hand quantity and low-stock threshold.
taxable / snap_eligibleReviewed true/false tax and SNAP flags.
skuOptional internal code; preserve it as text.

Preview and import

  1. Choose Choose Excel / CSV and select the file.
  2. Read the preview and validation messages. Correct duplicates or invalid values in the file and load it again.
  3. Choose Review and import, review the confirmation and commit only the intended items.
  4. Check the inventory list afterward. Imported items start hidden from the cashier grid; turn on Show on cashier for the buttons you want and arrange them.
24Inventory and purchasing

Create promotions and mix & match

Configure automatic offers and verify them with representative baskets.

ACCESSInventory and promotions

Item promotion

  1. Open Settings → Inventory → Promotions → Add promotion.
  2. Enter a promotion name and select the product.
  3. Choose Percentage off or Special item price under Offer type, then enter Discount percentage or Special price. Set Starts and Ends; the default is Immediately with No end date.
  4. Review the Enabled setting and save.
  5. Test a basket during the offer period and confirm the actual price. Edit or disable the offer when it should stop.

Mix-and-match bundle

  1. From Promotions choose Mix & match → Add mix & match.
  2. Name the offer and enter Any quantity and Bundle price; for example, a chosen number of eligible products for one bundle total.
  3. Search and select the eligible items.
  4. Set the offer schedule, review Enabled, and save.
  5. Test both a qualifying bundle and a basket below the required quantity. Check the displayed price before using the offer live.

Offer behavior

Automatic offers depend on the saved items, quantities, schedule and enabled state. Open-price items do not receive automatic promotions. The checkout validates pricing again before saving.

Keep offer names and terms clear for cashiers. When offers overlap, verify the final basket calculation instead of assuming discounts stack in a particular order.

25Inventory and purchasing

Add and manage suppliers

Keep supplier contact details ready for deliveries and purchase orders.

ACCESSInventory + Suppliers

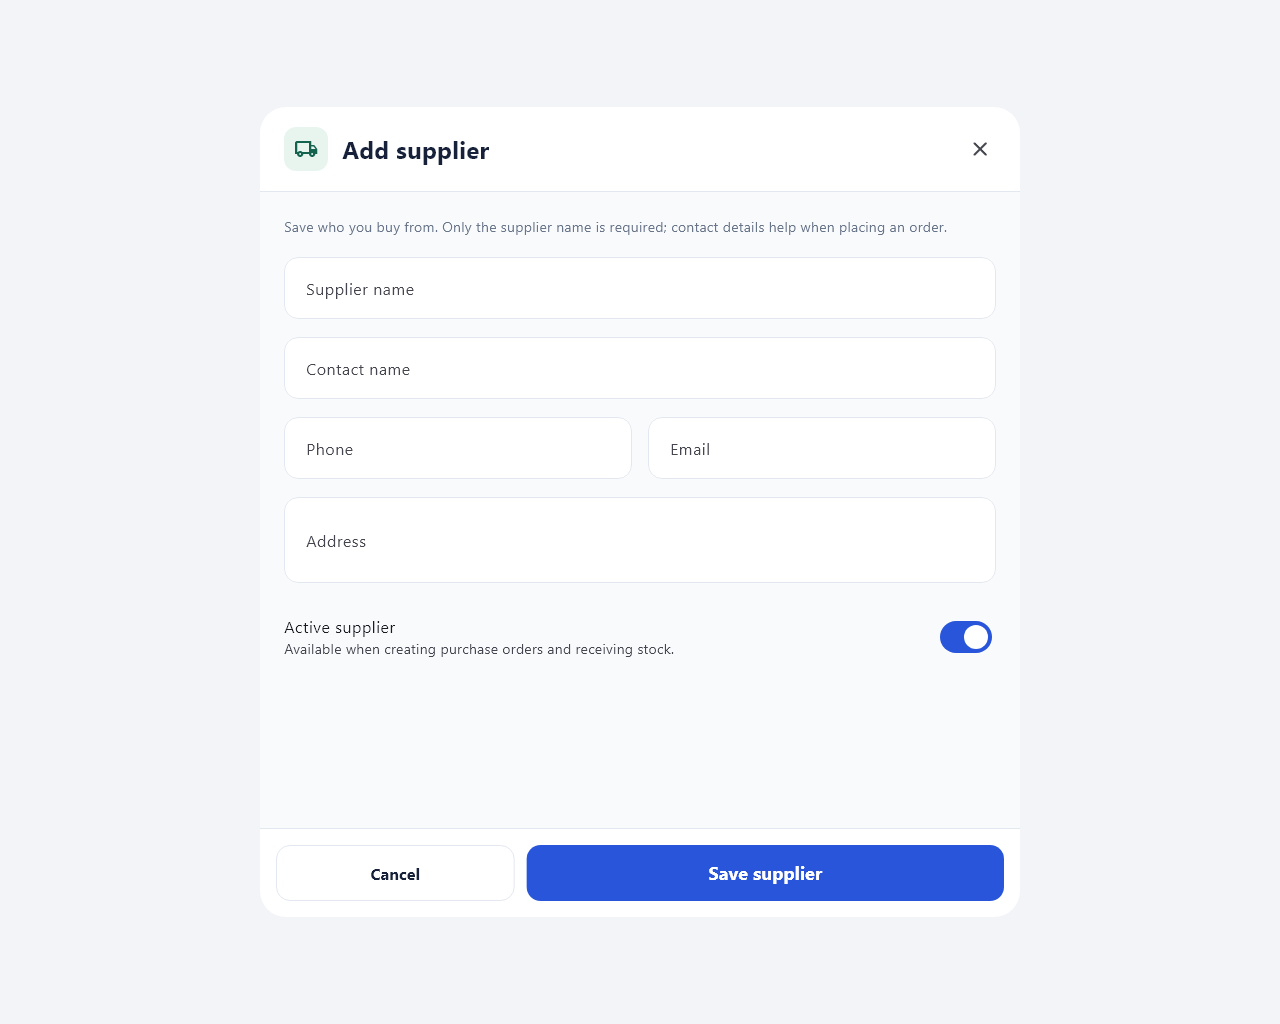
Add supplier form for supplier name and contact details
Only the supplier name is required; contact details help with ordering. View full size

Create a supplier

  1. Open Settings → Inventory → Suppliers → Add supplier.
  2. Enter the supplier name and any contact, phone, email or note fields that apply.
  3. Leave Active supplier enabled if it should be selectable for new orders and deliveries.
  4. Choose Save supplier and check the supplier list.

Add a supplier while making an order

In a new purchase-order draft, choose Add supplier. Save the supplier and return to the draft; the new supplier is selected automatically and the draft items remain.

Edit contact details when they change. Deactivate a supplier that should no longer be chosen for new work; historical receiving and order records remain available.

26Inventory and purchasing

Create and manage purchase orders

Order stock from a supplier, print the order and receive deliveries against it.

ACCESSInventory + Purchase orders

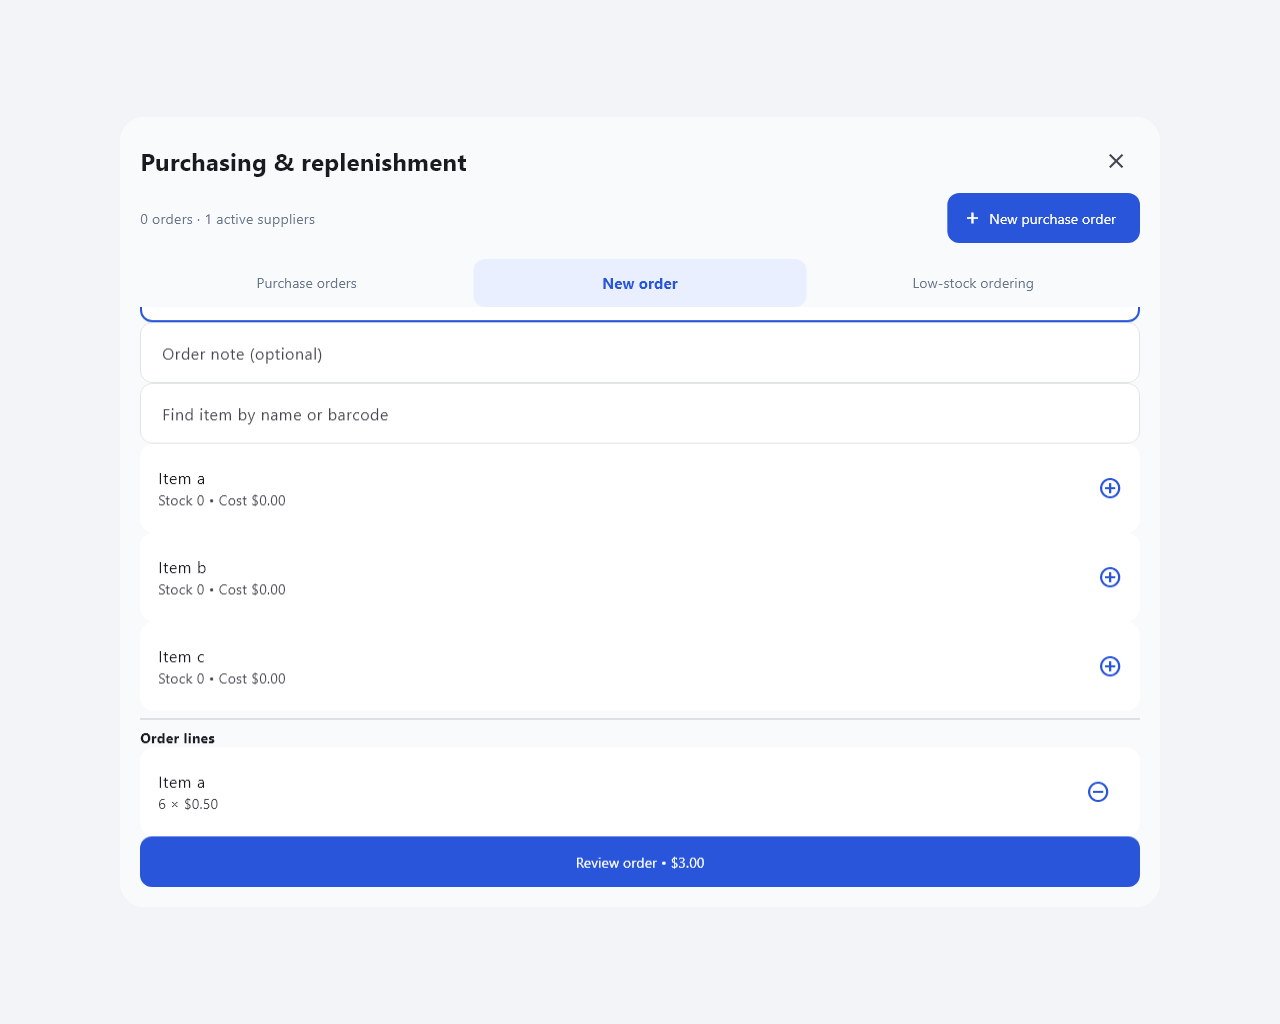
Purchase order review showing ordered items, quantities and costs
Creating an order does not add stock. Receive the delivered quantities when goods arrive. View full size

Create an order

STS POS records the order; it does not automatically email it, submit it to the supplier or pay the supplier. An unsubmitted draft can be discarded without changing stock.

  1. Open Settings → Inventory → Purchase orders → New purchase order.
  2. Choose the supplier, or use Add supplier. Enter a purchase order reference and optional note.
  3. Find each item by name/barcode. Enter Quantity to order and Ordered cost per item, then add it to the draft.
  4. Review draft lines and the total. Choose Review order, then confirm creation.
  5. Open the saved order and choose Print / save order for a supplier copy. Arrange sending/placing the order with the supplier yourself.

Receive a delivery against an order

  1. Open the saved order and compare Ordered, Received and Remaining quantities.
  2. Enter the actual Receive now quantity for each delivered line and the supplier delivery/invoice reference.
  3. Choose Review & receive delivery and confirm after checking the physical goods.
  4. For a partial delivery, leave the remaining quantities open. Receive later deliveries against the same order.

Low-stock suggestions and cancellation

Use the low-stock/replenishment area to review items, assign a preferred supplier and set the target stock. Review a suggested order before creating it; suggestions do not automatically purchase goods.

To stop an outstanding balance, enter a reason and choose Cancel remaining order. Already received stock stays in inventory. If goods must be removed or corrected, use the appropriate recorded inventory action.

27Inventory and purchasing

Receive stock and make adjustments

Record actual deliveries and explain stock corrections with a permanent history.

ACCESSInventory + Receiving/stock adjustments

Receive goods without a purchase order

  1. Open Settings → Inventory → Receiving and choose the delivery area.
  2. Select the supplier and enter the delivery/invoice reference and note where offered.
  3. Find/scan the product, enter the quantity actually delivered and the cost, then choose Add to delivery.
  4. Repeat for all delivered items. Review the full delivery before confirming.
  5. Check the resulting stock and the Receiving history. Receiving enables stock tracking for the item when indicated.

Correct stock

Use a physical count for a full stocktake. Use purchase-order receiving for goods against an existing order to keep its remaining quantities correct.

  1. Open the adjustment area in Receiving and select the correct item.
  2. Enter the intended stock change using the field shown, with a clear reason such as damage or a verified correction.
  3. Review the previous quantity and resulting quantity. Do not confuse a change amount with the total count.
  4. Confirm once and review the entry in History.

Review history

Receiving history shows deliveries, adjustments and posted counts, including their item quantities and reasons/references. Investigate a discrepancy from that history before entering another correction. A purchase order alone does not change stock.

28Inventory and purchasing

Perform a physical stock count

Count what is actually on the shelf and review differences before updating inventory.

ACCESSInventory + Stock counts

Count and post

  1. Open Inventory → Inventory tools → Physical count during a quiet period.
  2. Enter a count name and choose Start physical count.
  3. Scan or search each item, enter the physical quantity and choose Save count. Saved entries survive a restart.
  4. Count every listed item, including an explicit zero for an item with none on hand. Uncounted items prevent posting.
  5. Choose Review variances & post. Check every change from previous stock to counted stock, then confirm.
  6. Review the posted count under Receiving → History.

Changed inventory or an unwanted draft

Posting checks whether stock changed while the count was in progress. If it did, choose Restart with current stock and recount. That clears the saved counted quantities and loads current stock; do not reuse an outdated count without checking.

Discard draft removes only the unfinished count entries and leaves inventory stock unchanged. Posting a reviewed count creates permanent stock adjustments.

29Inventory and purchasing

Print product barcode labels

Print scannable product labels using the available roll or sheet layouts.

ACCESSInventory tools access

Prepare and print labels

  1. Open Inventory → Inventory tools → Barcode labels.
  2. Choose the products that need labels and the number of copies using the offered controls.
  3. Choose a format that matches your stock: 50 × 30 mm roll, 62 × 29 mm roll, or Letter • 3 × 8 grid.
  4. Use the print action and choose the correct label printer/PDF destination and paper in its print dialog.
  5. Print one test page/label, check alignment and scan it before printing a large batch.

If a label does not scan

Check that the item has the correct barcode, the entire barcode is printed, and scaling has not cut off its edges. Confirm the chosen label size matches both the printer and the physical label stock.

Product-label printing is separate from the saved receipt-printer choice. A receipt barcode opens a saved sale; a product barcode adds or finds an inventory item.

30Staff and store settings

Add staff, Managers and Owners

Create individual accounts in the POS or website dashboard and keep employee access current.

ACCESSOwner / Manage staff permission

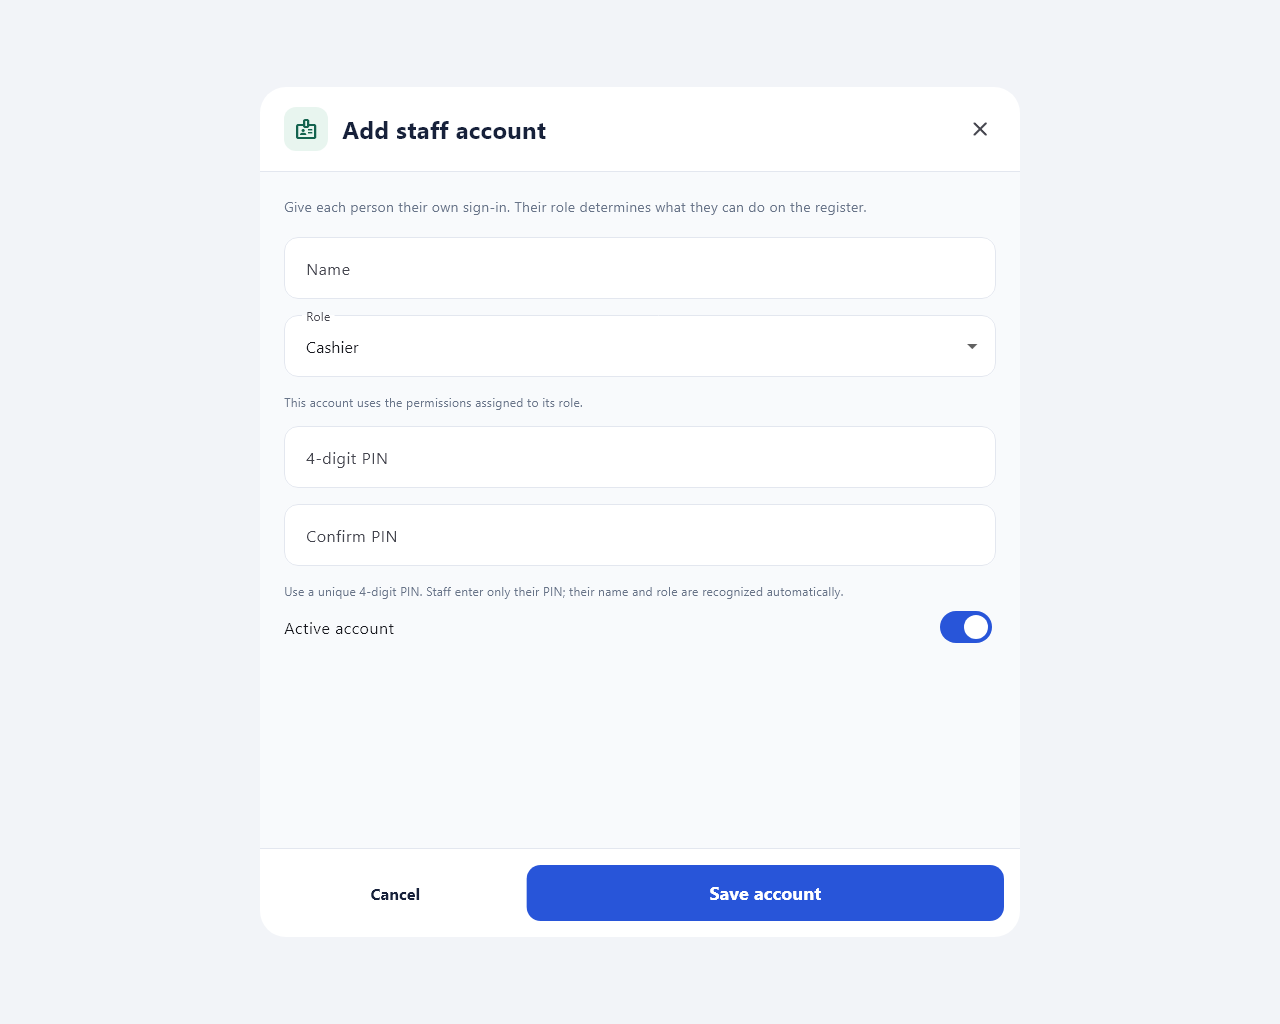
POS Add staff form with account name, role and PIN fields
Every employee should have an individual account and unique sign-in credentials. View full size

Add an account in the POS

  1. Open Settings → Staff & roles → Staff accounts and choose the add-account action.
  2. Enter the employee name and select Cashier, Manager or Owner. An Owner account also needs a username.
  3. For Cashier/Manager, enter and confirm a unique four-digit PIN. For Owner, enter and confirm a 12–128 character password; an optional Owner PIN can also be set.
  4. Check Active account and choose Save account.
  5. Have the employee sign in with their own credentials and check their displayed role/access.

Add accounts from the website

Website-created accounts are for the POS system. They do not grant the employee website login access.

  1. Sign in to the verified customer website account for the store.
  2. Open Dashboard → Staff accounts. The POS must have connected and completed its first sync before website staff management is available.
  3. Create or edit the Cashier, Manager or POS Owner and save the requested credentials.
  4. Keep the registers online and allow normal sync. Have affected employees sign in again after the update.
  5. If the website reports a newer version/conflict, refresh staff and reopen the editor before saving again.

Edit, reset or deactivate

Edit the existing account to change its name/role, reset its PIN/password or turn off Active account. Where the form says blank to keep, leave the credential field empty to retain the existing value.

Owner PIN sign-in can be removed without removing the Owner password. Keep at least one active Owner. Use deactivation for an employee who leaves; past sales retain their history.

After a role or permission change, require a fresh sign-in. Check each connected register has received the change before relying on the restriction.

31Staff and store settings

Manager and Cashier permissions

Choose what each role can do, including separate receipt and inventory permissions.

ACCESSOwner / role management

Change a role

Owner access is protected and includes all permissions. Default Cashiers can make sales, apply manual discounts, print saved receipts and scan receipt barcodes. Default Managers also have operational inventory/layout/history/day/No sale access; sensitive permissions are still controlled separately. Review the actual saved policy instead of assuming a title grants everything.

  1. Open Settings → Staff & roles → Roles & permissions.
  2. Choose Edit for Manager or Cashier.
  3. Review each permission below and enable only the actions that role should perform.
  4. Save, then have affected staff sign in again. Changes apply to all accounts with that role.
  5. Keep every register on build 16 or later before relying on the granular receipt/inventory restrictions.

Complete permission reference

PermissionAllows
Make salesBuild and complete checkout.
No sale – open cash drawerRequest a logged drawer opening without a sale.
Return items and issue cash refundsUse return/refund actions; non-cash refunds still require the terminal workflow.
Record cash paid in / paid outRecord drawer cash movements.
Apply manual item and receipt discountsUse manual discounts.
Clear transactions without manager approvalClear an unpaid transaction directly.
Approve transaction clearing with a Manager PINProvide a permitted approval for another employee’s clearing request.
Inventory and promotionsAccess catalog and promotion tools; granular tasks also need their own permission.
Arrange item buttonsChange the cashier layout.
View sales historyAccess the permitted history views, including other staff’s sales.
View purchase costs and profit reportsAccess sensitive cost/profit information.
Review manager alertsReview activity alerts and notes.
Start/end day and print reportsOpen/close register days and use their report actions.
Change sales taxEdit sales-tax settings and permitted item tax treatment.
Register, camera and receipt settingsConfigure the relevant hardware/store settings.
Print saved receiptsUse receipt-copy actions.
Open a saved receipt by scanning its barcodeLook up a local saved receipt from the scanner.
Add and edit suppliersManage supplier records; also needs Inventory.
Create and manage purchase ordersManage orders; also needs Inventory.
Receive deliveries and adjust stockPost deliveries/corrections; also needs Inventory.
Count stock and post adjustmentsPerform physical counts; also needs Inventory.
Import inventory from Excel or CSVImport reviewed catalog files; also needs Inventory.
Manage staff accounts and rolesManage staff/role tools subject to protected Owner rules.

Actions reserved for Owners

Some controls explicitly require the Owner role even if another role has broad settings access, including payment-method setup/simulator, backup/restore, cloud connection and application exit. Follow the access message on the screen. Never solve a permission problem by sharing the Owner password.

32Staff and store settings

Tax, payment buttons and receipt lines

Set the register tax rate, accepted methods, button colors and repeated-scan display.

ACCESSOwner / tax or settings permissions

Set the tax rate

This version uses the configured register tax percentage and item tax flags. It does not provide a general multi-rate tax-rule engine or determine your local tax obligations. Ask the appropriate adviser for your store’s required treatment.

  1. Open Settings → Checkout & tax → Change sales tax.
  2. Enter Tax percentage as a percentage, review it and save.
  3. Review Apply sales tax on each inventory item so exempt items are configured intentionally.
  4. Use a representative test basket to check the calculation before taking real payments.

Choose payment methods and colors

Disabling EBT also hides live EBT eligibility on checkout and the customer display. It does not rewrite historical receipts that were actually paid using EBT.

  1. As Owner, open Settings → Payment methods.
  2. Enable the methods actually used: Cash, Credit, Debit and/or EBT. Keep at least one method enabled.
  3. Use Color next to a method to choose its button color and review readability.
  4. Choose Save changes, return to Register and verify the available payment buttons.

Repeated scans

Under Checkout & tax → Repeated scans / item taps, choose Combine into one line to show quantity 2 for two matching scans, or Separate line for each scan to show separate lines in scan order. Save settings; the change applies to the next receipt.

33Staff and store settings

Customize receipt information

Add business details and messages while keeping required sale information visible.

ACCESSRegister/receipt settings

Edit the design

  1. Open Settings → Receipt design.
  2. Enter the business address, phone, email and website fields you want to print. Only filled-in details appear.
  3. Add an optional header message above the items and a footer message such as store hours or a return-policy summary.
  4. Choose whether to show the register name and cashier name.
  5. Review the preview, choose Save changes, then print a test receipt with the selected paper width.

Message limits and saved receipts

Use Enter for a new line. The header supports up to 240 characters and 4 lines; the footer supports up to 600 characters and 8 lines. Keep text short enough to read on your receipt roll.

Receipt number, date, totals and the return barcode stay on printed receipts. Completed receipts keep their saved sale details; changing the design or store details does not turn an old sale into a new one.

The printer and paper width are selected separately under Hardware. A clipped receipt is often a paper/driver mismatch, not a message problem.

34Hardware and customer display

Receipt printer and cash drawer setup

Select the Windows printer once, match its paper, and test the drawer connection.

ACCESSRegister settings / No sale to test drawer

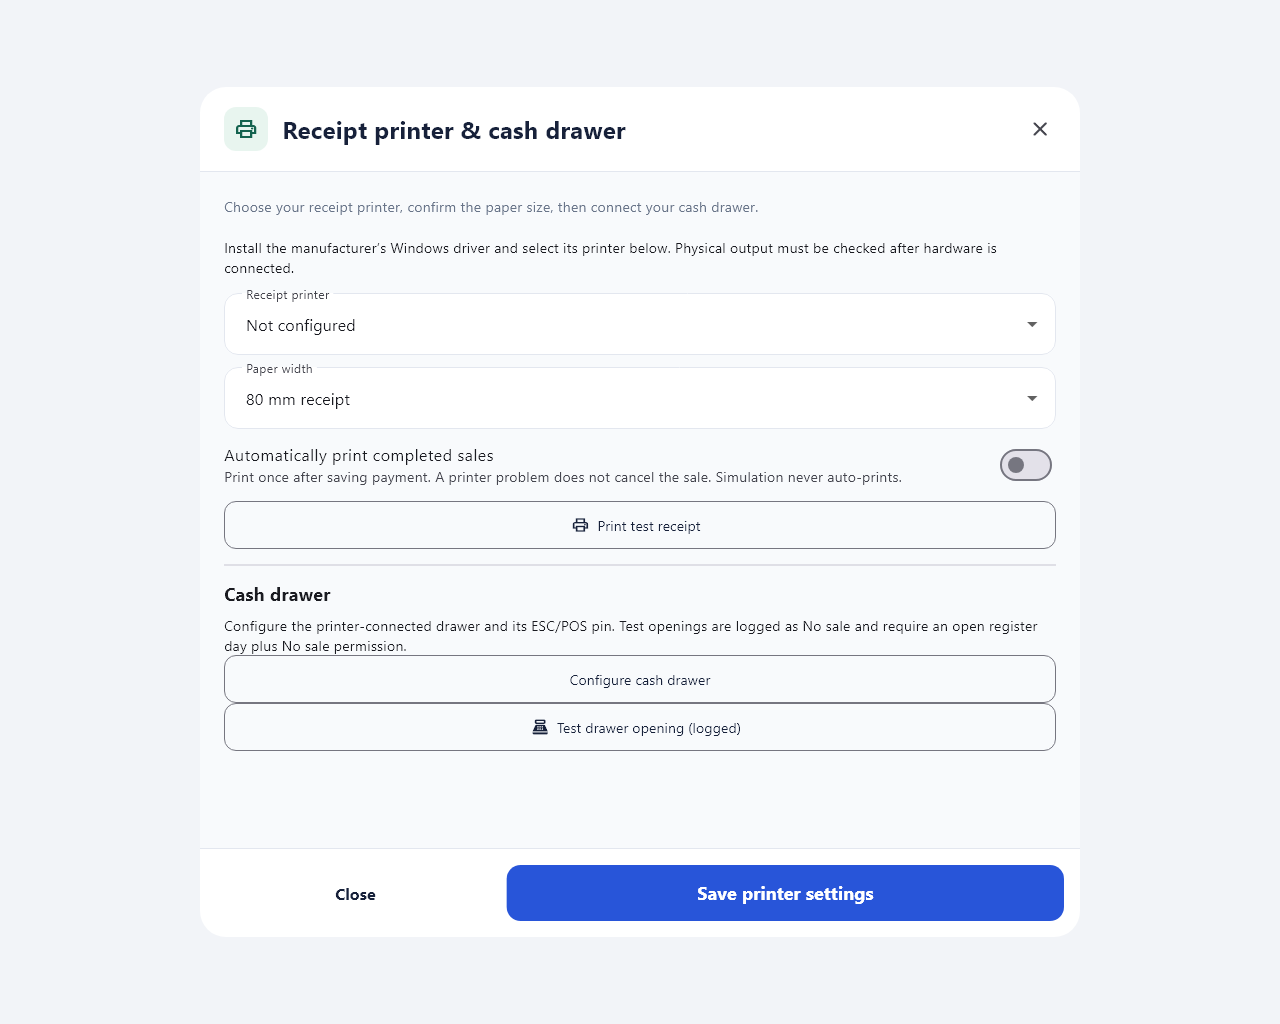
Receipt printer and cash drawer configuration with printer, paper width and automatic printing controls
The saved receipt printer is used by Print receipt and Reprint last receipt. View full size

Prepare the hardware

  1. Connect and power the printer. Install the correct manufacturer driver in Windows and confirm Windows can print a test page.
  2. Load the correct receipt roll and check the cover/cutter. Connect the cash drawer to its supported printer connection according to the manufacturer instructions.
  3. Open Settings → Hardware → Receipt printer & tests in STS POS.

Save receipt printing

The automatic-print switch controls printing at sale completion. Manual Print receipt and Reprint last receipt still use the saved printer even when automatic printing is off. Label/report printing can use their own print dialogs.

  1. Choose the actual Receipt printer from the Windows printer list.
  2. Set Paper width to match the printer and roll. Use the offered 58 mm or 80 mm receipt format as appropriate; choose a larger/PDF format only for that intended destination.
  3. Enable Automatically print completed sales if every completed sale should request a receipt.
  4. Choose Save printer settings.
  5. Use Print test receipt, then check the physical printout, margins, totals and barcode.

Configure the cash drawer

  1. Choose Configure cash drawer from Hardware or the receipt-printer screen.
  2. Select the receipt printer physically connected to the drawer.
  3. Select Pin 2 (drawer 1) or Pin 5 (drawer 2) according to the printer/drawer manual. This is a hardware connector setting, not an employee PIN.
  4. Enable ESC/POS drawer pulse only for compatible hardware, then save. The configured pulse is 100 ms.
  5. Use Test drawer opening (logged) or No sale, enter the required reason and verify the drawer physically opens.

How automatic actions behave

A completed sale requests the configured drawer after the sale saves, including the separate-terminal slip workflow. The app guards against automatically repeating an uncertain drawer request. A receipt copy never pulses the drawer.

If a print/open command is queued, that does not prove the hardware acted. Check the device, cable and Windows queue before retrying. Do not repeat a completed sale to fix hardware output.

35Hardware and customer display

Customer monitor and automatic startup

Choose a second monitor and let STS POS reopen it automatically on future launches.

ACCESSRegister settings

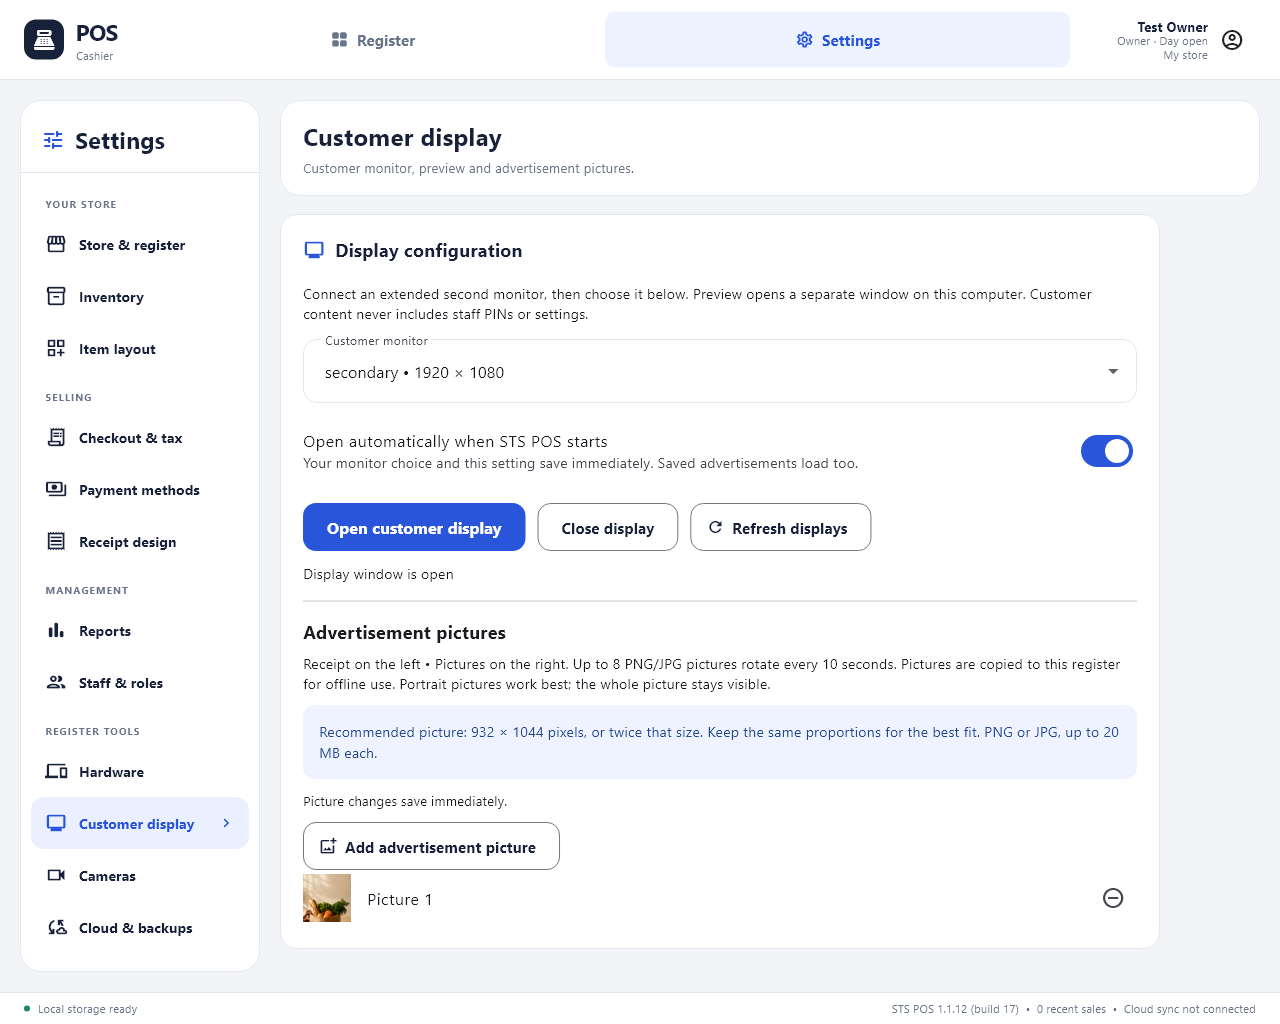
Customer display setup with secondary monitor selected and automatic startup enabled
Selecting an extended monitor saves it immediately and enables automatic opening. View full size

Connect and open the display

  1. Connect the second monitor to the Windows register and configure Windows to extend the desktop onto it.
  2. Open Settings → Store & register → Quick setup → Customer display. You can also choose Customer display directly in Settings.
  3. In Customer monitor, choose the extended customer monitor. The primary cashier monitor is not offered as a normal customer-monitor choice.
  4. Choose Open customer display. Check the STS logo, store name, welcome content and the customer-facing receipt area.
  5. During checkout, verify the customer display reflects the basket and enabled EBT-eligible amount without showing staff credentials or settings.

Save it for the next launch

Choose the monitor once after updating to build 17, because earlier versions did not save its selection. Each register keeps its own choice.

Close display closes the current window only. Turn off the automatic-opening switch to stop opening on future launches. This feature starts the display when STS POS opens; it does not start the POS automatically with Windows.

  1. Leave Open automatically when STS POS starts enabled. Selecting an extended monitor turns it on and saves the choice immediately.
  2. Exit STS POS normally as Owner and open it again.
  3. Confirm the chosen monitor opens with welcome content and saved advertisements before employee sign-in.

Preview or disconnected monitor

Preview on this computer opens a separate preview window without a second monitor. Preview is temporary and does not automatically open at startup.

If a saved monitor is disconnected or becomes the primary monitor, the POS keeps the saved choice and leaves the cashier screen usable. Reconnect it, choose Refresh displays, then Open customer display, or reopen the POS. Select a different extended monitor if the hardware arrangement changed.

36Hardware and customer display

Customer-display advertisement pictures

Build a local slideshow with images that fit the selected monitor.

ACCESSRegister settings

Add pictures

  1. Open Settings → Customer display and select the intended customer monitor.
  2. Read the recommended picture dimensions shown for that monitor.
  3. Choose Add advertisement picture and select a PNG or JPG of up to 20 MB.
  4. Add up to eight pictures. The slideshow rotates them every 10 seconds, with the receipt on the left and pictures on the right.
  5. Check the result on the actual display. Use Remove from slideshow to remove an unwanted picture. Picture changes save immediately.

Choose the right image size

Use the exact suggested aspect ratio shown in setup. For a 1280 × 1024 customer monitor, the advertisement area is 612 × 988 pixels; 1224 × 1976 is a sharper image with the same proportions. Other monitor sizes show their own dimensions.

Portrait layouts usually fit this area well. The whole picture remains visible; a differently shaped image leaves space around it. Use readable text, generous margins and a clear offer rather than tiny details.

Use your own or licensed artwork. The POS copies selected pictures to this register for offline use; removing a slideshow entry does not delete your original image.

Backups and multiple registers

Advertisements are local to the register and load with its saved customer display. Keep the matching media folder with a database backup when copying or restoring backups. Configure pictures on each register that needs them.

37Hardware and customer display

Camera settings and optional integrations

Understand which connection settings can be saved and which integrations need support.

ACCESSRegister settings

Camera configuration fields

Open Settings → Cameras to show/hide the cashier camera panels and label up to four camera positions. Connection fields are saved for the configured camera setup.

FieldEnter
Camera nameA useful location label, such as Entrance or Counter.
Host / IP addressThe device hostname or IP address only; no URL prefix, path or port.
ONVIF port / HTTPS / service pathThe values supplied for that camera; the service path starts with /.
Video (RTSP) port / transportThe device’s video port and TCP/UDP setting.
Username / passwordThe camera’s own credentials. A blank password keeps the saved value unless removal is selected.

Save and understand the current limit

Choose Save changes after editing. The saved password is protected for this Windows user/device; moving a register or restoring on another computer can require re-entering camera credentials.

In this release, the cashier camera panels show Camera not connected. Saving connection details does not enable a working live-video feed or recording. Contact STS about supported camera integration; use the camera’s own system for monitoring.

Scales and payment terminals

Scale/weight-label integration is disabled in the standard Windows build and requires a supported, tested setup arranged with STS. Do not assume connecting a scale makes weight checkout available.

Direct PAX integration is also pending. Credit, Debit and EBT currently use separate-terminal processing with cashier confirmation in the POS.

38Backups, updates and support

Cloud sync, offline use and dashboard

Keep register data synchronized and understand what remains local.

ACCESSOwner for connection changes

Check the connection

  1. As Owner, open Settings → Cloud & backups and the Store cloud connection controls.
  2. Confirm the intended store/register and review the connection status, last successful sync, pending entries and conflicts.
  3. Connect using the offered action only for the correct store. Existing local data is backed up before connection.
  4. Keep the register online to complete the first sync and receive staff/catalog changes.
  5. Check the footer and Register health for current status; use Review cloud conflicts if changes need attention.

Shared data and local data

A dashboard report can lag while entries are pending. Cloud synchronization is not a complete substitute for register backups.

Shared / uploadedLocal to the register
Inventory, staff accounts, role permissions and supported store settingsPrinter/drawer connections, customer-monitor selection and display startup preference.
Sales/activity uploads for owner reportsLocal saved receipts and receipt-barcode lookup on the issuing register.
Cloud-backed business records where supportedItem-button pictures, advertisement files, camera credentials and backup locations.

When internet is unavailable

Local records are retained and configured cloud updates queue for reconnection. An activated, paid register can operate offline for up to 72 hours after a successful license check, within its subscription deadline. Use the actual “Internet check required by” time shown on your register.

Card and EBT availability depends on your separate terminal/provider. A working POS offline does not mean the payment terminal can authorize offline transactions.

If a conflict appears, read the affected record and the choices presented. Do not delete local data or reconnect to another store to make the message disappear. Ask support for staff-identity or stock-count conflicts that need reconciliation.

39Backups, updates and support

Automatic backups and a second copy

Save verified backups and keep another copy away from the register’s main drive.

ACCESSOwner

Configure backups

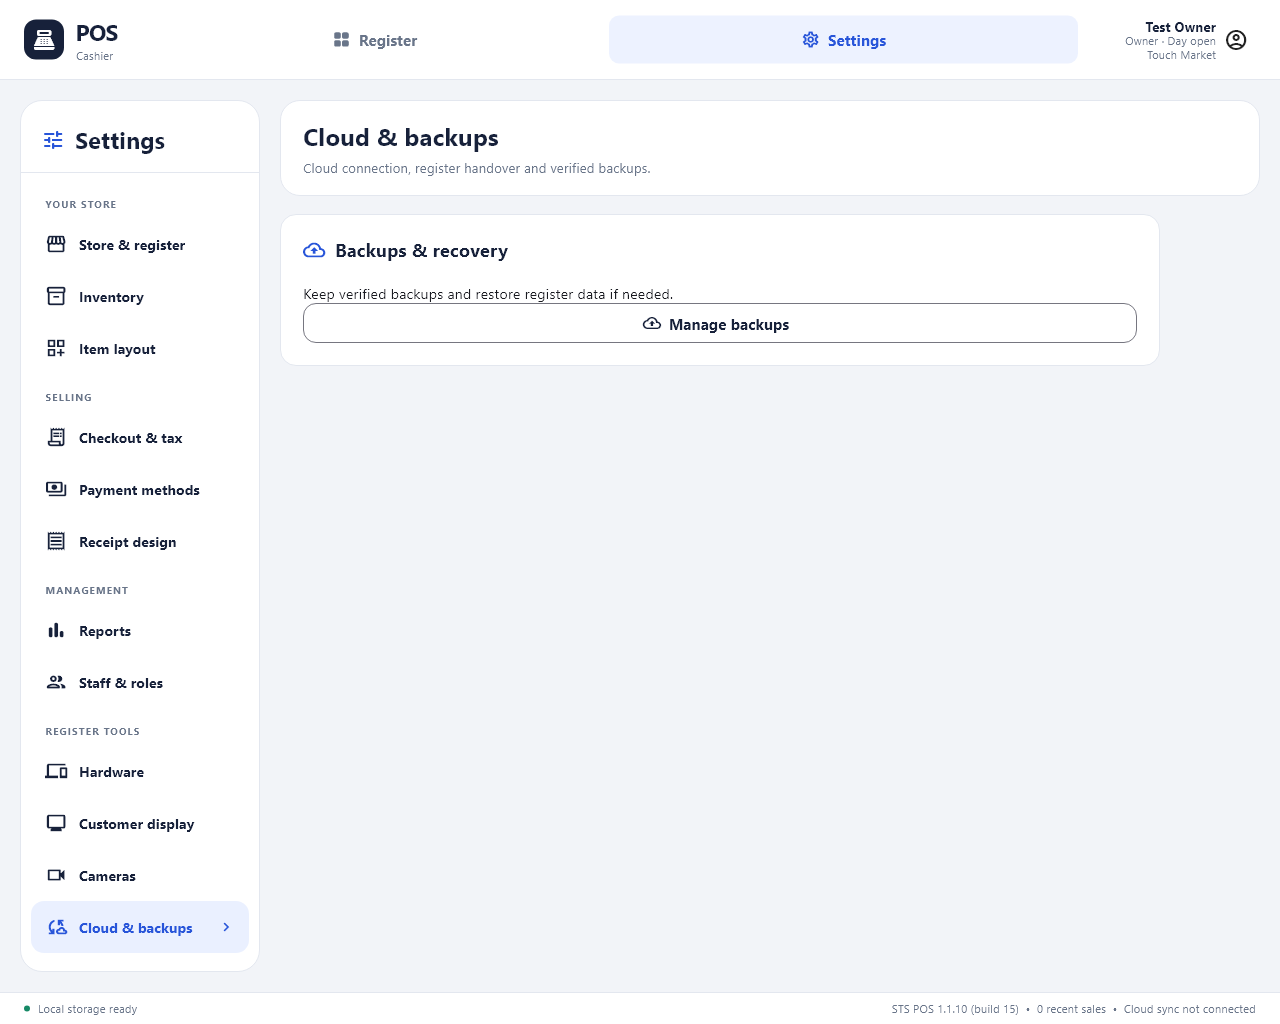
  1. Open Settings → Cloud & backups → Manage backups.
  2. Turn on Automatic backups and choose the backup folder.
  3. Choose an interval: every 1, 4, 12 or 24 hours.
  4. Set local retention to keep all backups, or the newest 7, 30 or 90 backups.
  5. Choose a second-copy folder on a separate drive or protected network/cloud-synced location.
  6. Choose Save settings, then Back up now. Confirm the “created and verified” result and check the displayed backup location.

When and what is backed up

The app checks scheduled backups hourly and after closing the day. It must be running for its scheduled checks. Retention removes older primary-folder backups only after a verified backup; the second-copy destination keeps its copies.

Backups include private register data and login credentials. Item-button pictures are included in the database. Advertisement files are kept with the backup’s matching .sqlite.media folder; keep that folder together with its .sqlite file.

The app does not encrypt backup files. Restrict access and protect the backup destination. A copy on the same failing drive is not protection against drive failure.

Check backup health

Review the latest verified backup in Register health. Check available disk space and whether the second destination is connected. If a backup fails, correct the path/permissions/space and try Back up now again.

Before an important change, update or computer replacement, make a current backup and keep it accessible. Do not use another store’s backup to create a new register.

40Backups, updates and support

Inspect and restore a backup

Understand the replacement operation before restoring older register data.

ACCESSOwner

Before restoring

Restoring replaces the active local register database with the chosen backup on the next launch. Changes made after that backup will no longer be active. It is not an undo button for a printer problem and not a way to merge registers.

Contact STS support before restoring a connected live register so local and cloud records can be handled consistently. Keep a current backup and identify the correct register, backup date and matching media folder.

Inspect and deliberately confirm

  1. As Owner, open Settings → Cloud & backups → Manage backups → Inspect & restore a backup.
  2. Select the intended backup file and review the displayed counts of sales, items and staff.
  3. If anything is wrong, choose Cancel. Inspection by itself does not restore the data.
  4. Only when you intend to replace the active data, confirm Stage restore & close app.
  5. Reopen STS POS to apply the staged restore, then sign in using an account from that backup.
  6. Verify records, hardware paths and display pictures, and follow the agreed cloud-reconnection/reconciliation steps.
41Backups, updates and support

Install software updates

Update the register without resetting its accounts, inventory or sales.

ACCESSOwner

Update inside STS POS

  1. Keep the register online. Builds 14 and later check for updates and download them in the background; an account notification indicates available update activity.
  2. Finish or hold the current receipt and resolve every interrupted payment before installing.
  3. As Owner, choose Account → Software updates → Check for updates.
  4. When the verified installer is ready, choose Install now. The app verifies release information/checksum, creates a backup and closes for installation.
  5. Complete the installer, then choose Open STS POS or use the updated desktop shortcut.
  6. Confirm the version in the footer/Register health, check staff sign-in and test the configured printer/display.

Older versions or manual installation

Versions earlier than build 14 need the current installer from Website dashboard → Registers once to enable the in-app updater. Close the old POS normally before running the installer.

Keep the current database, activation and backup. Do not create a new store, erase the app data or reactivate an existing register merely to update it. Older app folders may remain; use the new shortcut because an old executable may not open an upgraded database.

After build 17

Choose the extended customer monitor once in Quick setup and leave automatic opening enabled if wanted. Print receipt and Reprint last receipt use the saved receipt printer and paper.

If download verification fails, leave the existing app installed, check internet/disk space and retry through the official updater or ask support. Do not bypass the checksum or use an unknown installer.

42Backups, updates and support

Move to a replacement computer

Release the old device correctly and preserve records that have not synchronized.

ACCESSWebsite account holder / Owner

If the old computer still works

  1. Make a current backup and keep the old computer available.
  2. Request the replacement from the website dashboard’s Registers area for the correct device.
  3. On the old register, finish receipts/held work as prompted, resolve payments/refunds and close its day.
  4. Open Settings → Cloud & backups → Store cloud connection → Complete handover.
  5. Review and choose Back up and hand over. Wait for backup and upload success; if uploading fails, the slot stays occupied so records are not silently lost.
  6. After the dashboard confirms replacement availability, install and activate the new computer using the normal process.
  7. Verify shared staff/catalog and arrange local hardware, pictures, camera credentials and backups on the new computer. Keep the old backup until the new register is checked.

If the old computer is broken or missing

Use the broken/missing replacement route in the dashboard and contact support. Administrator review and expiry of the old offline authorization may be required before the device allowance is released.

Records that never uploaded must be recovered from the old computer or a verified backup. Installing on a new machine cannot recreate data that exists only on an unavailable drive.

Do not copy activation credentials from another computer or activate the new register against a different store to bypass the replacement process.

43Backups, updates and support

Register health, lock and diagnostics

Check printer, backup, storage and sync status and collect a useful support report.

ACCESSRegister settings; Owner security controls

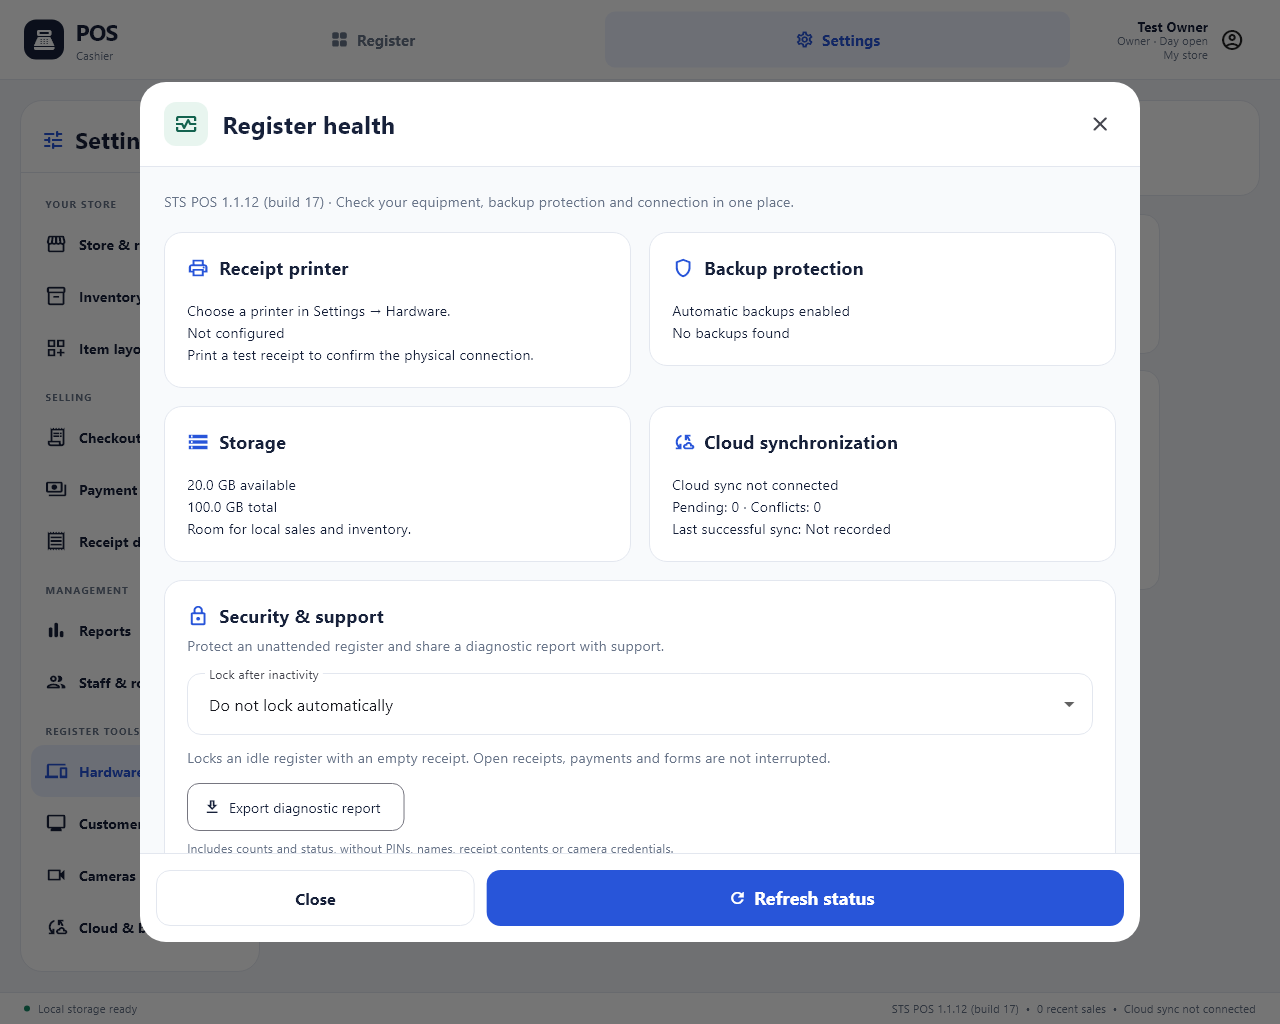
Register health cards for printer, backups, storage and cloud synchronization
Refresh health status and use a physical test to confirm hardware operation. View full size

Read the health screen

Printer status is a useful check, but a test receipt confirms the physical device. Customer-display configuration is in Quick setup/Customer display, not Register health.

  1. Open Settings → Hardware → Open register health.
  2. Review Receipt printer, Backup protection, Storage and Cloud synchronization.
  3. Use Refresh status after changing a cable, printer or network connection.
  4. Check queued print jobs, latest verified backup, available storage, pending sync entries and conflicts.

Lock after inactivity

As Owner, choose Lock after inactivity: no automatic lock, or 1, 5, 10 or 15 minutes. The choice saves when selected.

The automatic lock applies to an idle register with an empty receipt. It does not interrupt an open receipt, payment or form. Staff should still secure an unattended register deliberately.

Export diagnostics

Do not include full card numbers, customer PINs, passwords, activation codes or database backups in a public support message. Use the support channel agreed with STS for private files.

  1. Choose Export diagnostic report and save the file.
  2. Contact STS with the app version, store/register, device model, time of the problem, exact message and steps that caused it.
  3. Attach the diagnostic file when support requests it. The report contains counts/status rather than PINs, employee names, receipt contents or camera credentials.
44Training and quick reference

Train staff with Payment Simulator

Practice the complete cashier workflow without creating real sales or charging customers.

ACCESSOwner

Open a training session

  1. Finish or hold the live receipt so the current live basket is empty.
  2. As Owner, choose Settings → Payment methods → Open payment simulator.
  3. Confirm the amber TEST ONLY banner. Start a test day and enter a practice opening amount.
  4. Use the copied catalog to practice scans, buttons, quantities, discounts and Cash/Credit/Debit/EBT checkout.
  5. For simulated terminal payments, test Approved, Declined, Customer cancelled and Connection lost / unknown result. Try a partial approval and collect the remaining balance.
  6. Finish a test sale and verify the SIM- receipt. Leave the simulator and confirm you are back in the live register before serving customers.

What training does and does not do

The simulator uses temporary data and copies the saved catalog/layout/pricing needed for practice. Its sales and edits do not become live store records or upload to the cloud. All four methods are initially visible inside it independently of live payment visibility.

Leaving the simulator or closing/restarting the app discards its test records. It cannot prove durable restart recovery, real terminal authorization, live sync or physical printer/drawer behavior. Test those separately with support using an appropriate setup.

Any printed simulated receipt/report is marked as a test. Never give a simulated receipt as evidence of a customer payment.

45Training and quick reference

Opening, checkout and closing checklists

A short routine for every working day, with links to the detailed instructions.

ACCESSAll staff

Opening checklist

  • Power on the register and its connected hardware.
  • Confirm STS POS, the customer display and the correct store/register name.
  • Sign in using your own account.
  • Check printer paper, drawer connection and a known product scan.
  • Have an authorized employee count opening cash and start the day.
  • Review any recovery, license, sync or backup warning before selling.

For each customer

  • Scan/check items, quantities, price and age requirements.
  • Review discounts, tax and EBT eligibility.
  • Confirm the actual terminal result or cash received.
  • Collect only the remaining balance; return the displayed change.
  • Wait for the saved-sale confirmation and provide the receipt.
  • Never repeat a sale just to make the printer or drawer work.

Closing checklist

  • Resolve every pending payment/refund and deal with held orders.
  • Record cash paid in/out and reconcile terminal transactions.
  • Count physical cash, review differences and close the register day.
  • Print/save the required reports.
  • Confirm the backup and review cloud sync status.
  • Exit STS POS as Owner and secure the store’s hardware and private records.
46Training and quick reference

Troubleshooting and getting help

Use the symptom to find the next useful check without resetting store data.

ACCESSAll staff / Owner for setup changes

Installation and access

ProblemWhat to check
Download button unavailableVerify email, subscription approval and the dashboard’s allowance/status. Contact STS if payment is awaiting review.
Activation code rejectedCheck the intended store, available device allowance, internet and 10-minute expiry. Generate a fresh code if necessary.
Owner login rejectedUse the POS Owner credentials, not the website password. Ask support if no Owner can sign in; do not delete the database.
Register day closedAn employee with Start/end day permission must record opening cash first.
A Settings action is missingCheck role permissions and any Owner-only requirement. Sign in again after permission updates.
Subscription/access pausedCheck the register’s displayed deadline and website payment status. Reconnect and use Check access after verified renewal approval. Records are retained.

Checkout and inventory

ProblemWhat to check
Unknown product barcodeDismiss the warning, verify the exact code/leading zeros and confirm the item is active. Add/correct it through Inventory with permission.
Scanner types in the wrong placeFinish/close the active field or form and return to Register. Check scanner settings with support if normal checkout still fails.
Item button missingCheck Available for sale, Show on cashier and saved Item layout. Imported items start hidden.
Price or stock changed during checkoutReview the message, refresh/correct the unpaid basket and recheck the item. Do not overwrite quantities to force a sale.
EBT amount missingCheck that EBT is enabled and settings saved, and that the basket has reviewed SNAP-eligible items.
Cannot finish or close the dayLook for unpaid balances, pending terminal results, refunds or unfinished work. Resolve the original operation.
Import rejectedUse the template, first .xlsx worksheet or UTF-8 CSV, text barcodes/SKUs and values instead of formulas. Check size/item limits and preview errors.
Stock count cannot postCount every item. If stock changed, restart with current stock and recount before posting.

Hardware and data

ProblemWhat to check
Receipt does not printCheck power, roll/cover/cable, Windows printer queue, selected printer and paper width. A failed print does not cancel the saved sale.
Wrong printer or clipped receiptSave the correct printer/paper in Hardware. Test the actual roll and Windows driver settings.
Drawer does not openCheck the compatible printer connection, selected printer, connector pin and ESC/POS enable setting. A queued request is not proof of opening.
Customer display stays closedCheck Windows extended mode, the saved secondary monitor and automatic-opening switch. Refresh displays and open it again.
Advertisement has empty spaceUse the recommended aspect ratio for the selected monitor; the full image is fitted rather than cropped.
Item picture absent on another registerItem pictures are local. Add it on that register; normal sync does not transfer it.
Camera not connectedThis build saves connection settings but does not provide live camera playback. Contact STS about supported integration.
Cloud pending/conflictCheck internet, correct store and license status. Review conflicts; do not reset/reconnect to another store.
Backup failure / low storageCheck disk space, folder permissions and the second destination. Make a verified backup after correcting it.
Storage cannot open on launchKeep the exact message and existing files, close duplicate POS copies and contact support. Do not erase the data to force startup.

Contact support with the right details

Use the website Contact page or support@stspos.com. Include the app version/build, store/register name, hardware model, exact message and steps to reproduce. Mention whether a payment was actually approved and whether the sale/return is already saved.

For a terminal payment whose result is unknown, contact the payment provider too. Export a diagnostic report from Register health if requested. Avoid sharing customer payment details or sign-in secrets.

47Training and quick reference

Settings map and everyday terms

A complete map of the Windows settings areas and the terms used in this guide.

ACCESSReference

Settings map

Software updates and Owner application exit are in the account menu. Settings entries and actions vary with your signed-in role.

Settings areaContains
Store & registerStore/register identity and Quick setup shortcuts.
InventoryItems, categories, promotions, suppliers, purchase orders, receiving and Inventory tools.
Item layoutCashier button visibility/arrangement.
Checkout & taxTax rate and repeated-scan receipt display.
Payment methodsCash/Credit/Debit/EBT visibility, colors and Payment Simulator.
Receipt designBusiness contact details, messages, register/cashier visibility and preview.
ReportsSales history, register-day reports, profit, cash reconciliation and manager alerts.
Staff & rolesEmployee accounts, Owner/password/PIN settings and role permissions.
HardwareReceipt printer, paper, automatic printing, test actions, cash drawer and Register health.
Customer displayMonitor, startup switch, open/close/refresh controls and advertisement pictures.
CamerasPanel visibility/names and saved connection fields; live video is not enabled in this release.
Cloud & backupsStore connection/conflicts, replacement handover, backup configuration and inspect/restore.

Terms used in the POS

TermMeaning
Register dayThe register’s open selling period with opening/closing cash; not an employee time-clock shift.
Basket / current receiptItems being prepared for payment, before the sale is completed.
Held orderA saved unpaid basket for later resumption.
Saved receiptThe record of a completed sale; reprinting makes a copy.
Tender / applied paymentThe part of a sale paid using Cash, Credit, Debit or EBT.
EBT eligibleThe eligible basket amount based on reviewed item flags; not an approval or benefits balance.
Expected cashThe cash the POS calculates should be in the drawer from opening cash and recorded activity.
VarianceThe difference between counted and expected stock/cash.
Purchase orderA record of requested goods; stock changes when delivery is received.
SyncSharing supported records and uploading activity when connected.
BackupA recoverable copy of register data; media files must accompany it where applicable.
Device allowanceThe approved number of computers that may be activated for the store.
OwnerA POS role with protected full access; distinct from the website login.

Keep this guide close to the counter.

Bookmark it, share a chapter link with your team, or print a training copy. If you need help with your setup, we’re here.

Contact STS support